
When in Doubt, Scrap It Out (or "Just Sew Scraps")

Is sewing block a thing? I’ve been experiencing it lot in recent years. sometimes it lasts for months or years, sometimes a few hours or days. I know how to loosen this block, but whether I actually do it, is up in the air.
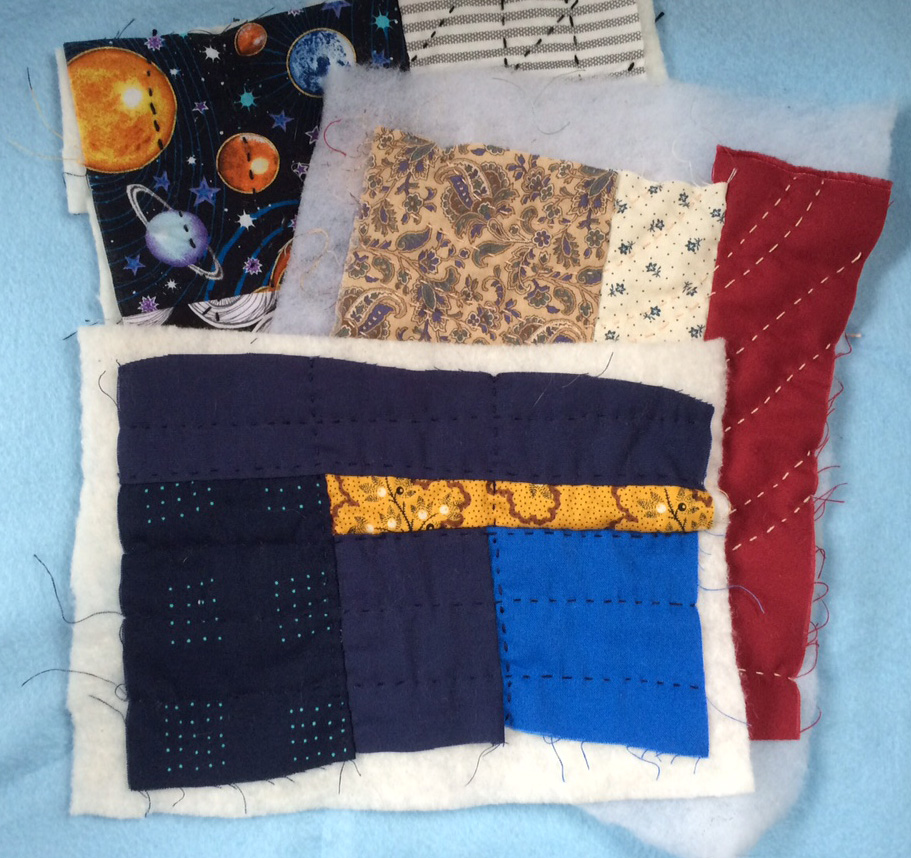
The best cure for sewing block, for me, is to get out the scarp bins. Just Sew Scraps could be a mantra.
I have been stumped with the quilt I’m working on. I’ve been only a few lines of quilting away from being ready to bind for over a month now. And yet, somehow I never pick it up to finish. The folded quilt leers at me from it’s spot near my favorite chair, ready for me to pick it up. The thread sits patiently on my desk so I have to look at it every morning. And yet….

Rooting around in the scrap bins feels less weighty, easier to tackle, more like play.
So, a few days ago I did the thing that I know will help unblock my sewing block, and I started sewing some scraps. And I feel so much better!!
What helps you unblock when you are suffering from a sewing block?
Linking up today with Kathy’s Quilts Slow Sunday Stitching. Glad to be back, as always.
WIP 12/20/15
This week I'm working on finishing something that should have been done at the beginning of the month. Ah, well, it'll be ready for the new year.

I'm also making a bunch of over stuffed pincushions to restock the shop with.

Linking up with Kathy's Quilts and her Slow Sunday Stitching.
WIP 11/29/15 + Sale News
I'm working furiously to get this WIP done...

...but life keeps getting in the way. Life has a way of doing that; keeping me from sewing, blogging, or getting my holiday sale up and going.
The holiday sale has been postponed until next weekend.
Still plenty of time to get orders out. Please keep your eyes peeled here and over at instagram!
I'm linking this post up with Kathy's Slow Sunday Stitching.
Decisions on a Sunday Morning + News!
I'm a little late posting this one, but am linking up with Kathy's Slow Sunday Stitching anyway!
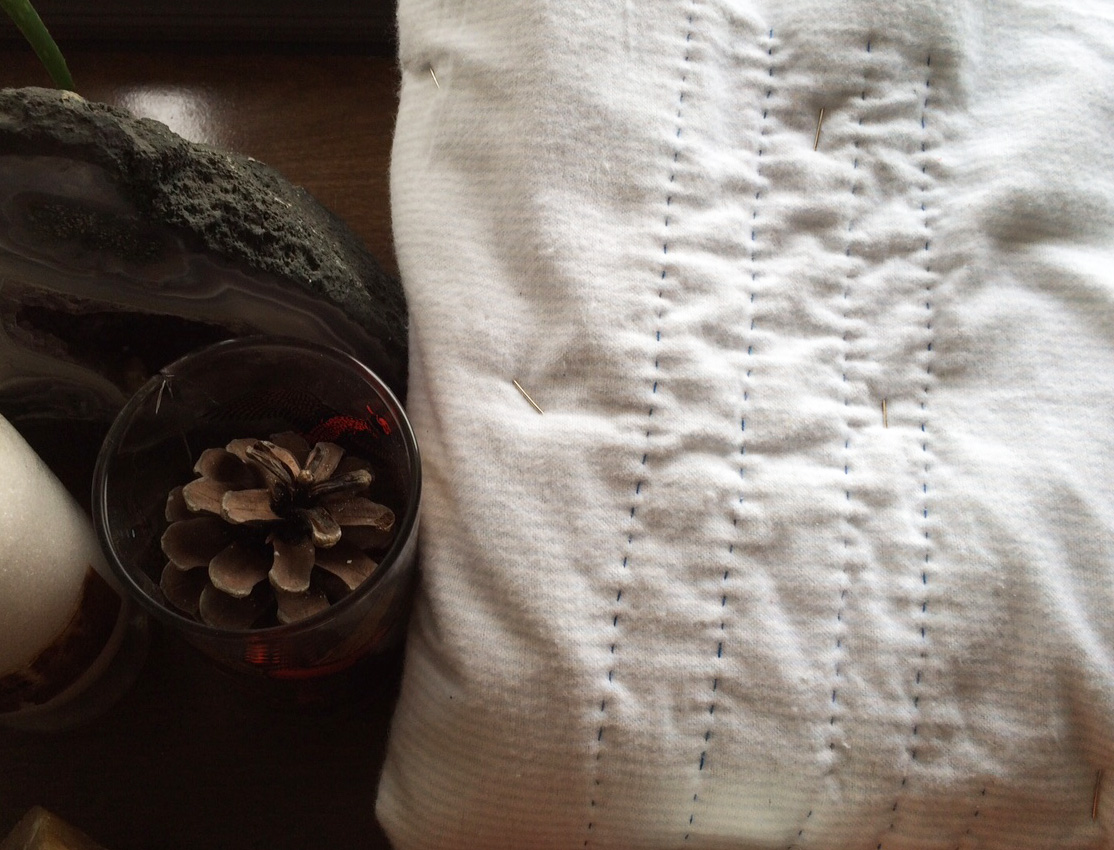
While unpacking, I've uncovered a lot of WIPs & UFOs. I made this mini quilt ages ago, so long now I can't remember. I do remember it was my first attempt at flying geese with not the best results. All my geese were cropped!! I've never quite gotten over it and haven't made flying geese since.

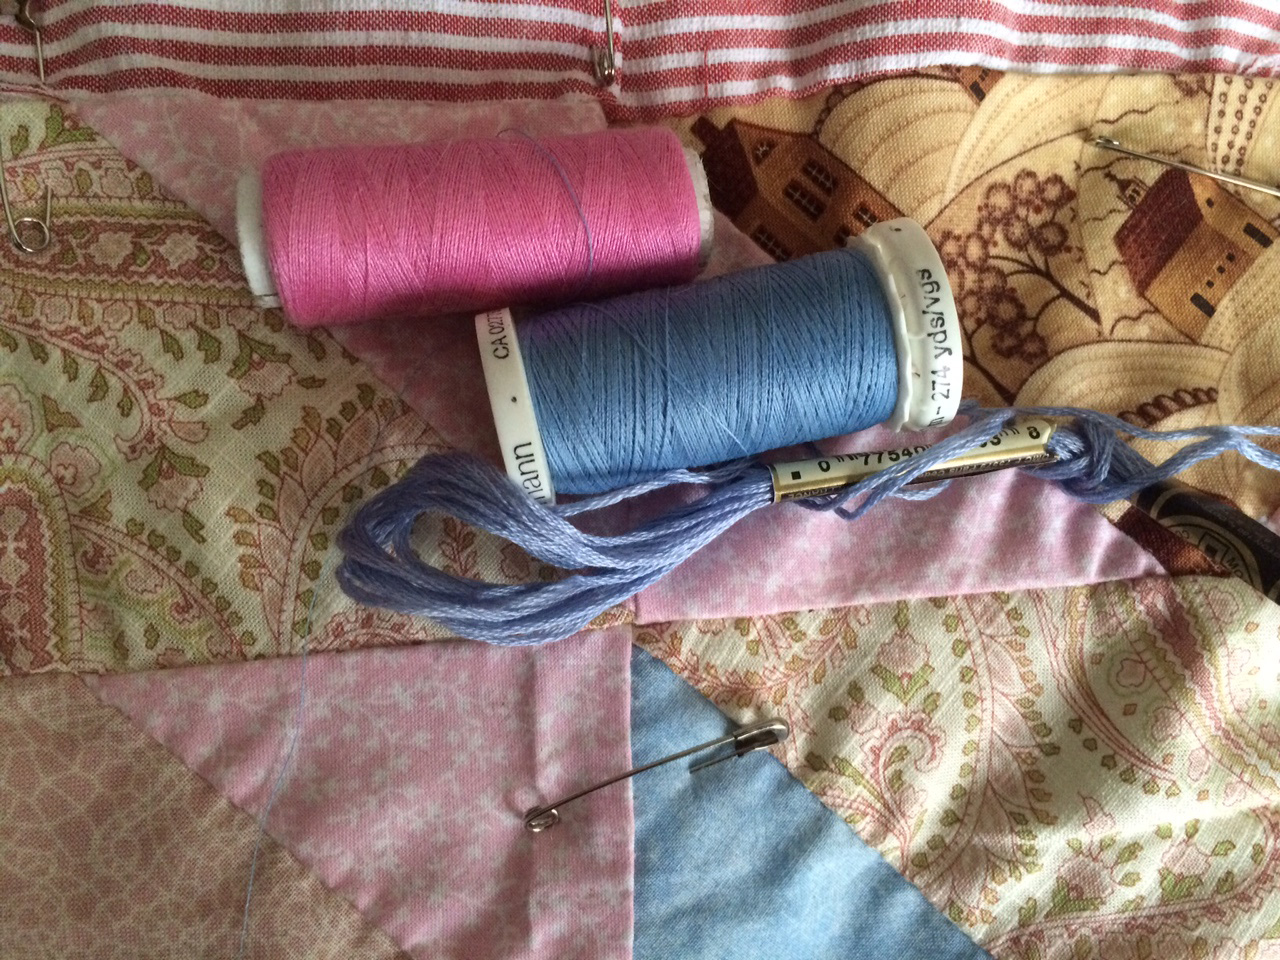
I still liked aspects of this mini, though, so when I found it I decided to back it and quilt it. But now, what to quilt it with? I picked out a few thread choices, but none seem quite right... Any suggestions?
I have a lot on my plate at the moment, so I'm not in a great rush to make a decision.
Now for the news! Mad Cat Quilts will be having a sale starting next weekend! Just in time for xmas gifts, of course! Look for updates and the start of the sale in the blog and instagram. There will be many small items, as well as sale prices on quilts! Keep your eyes peeled!
WIP 11/18/2015

WIP 9/16/15
Slowly but surely.

This year has not been great for meeting deadlines. I think making, meeting, or exceeding deadline will be a goal for 2016.
I'm working on some other new goals for next year, as well. How about you?
WIP 8/23/15
In an effort to post more and to sew more, I plan to start making weekly WIP posts.
This is a quilt blog, after all!


As usual, my work is all pieced and quilted by hand.
I found inspiration for this block here. Finishing this cushion is on my Q3 for 2015 Finish Along list here. I'm linking up with Kathy's Slow stitching Sunday.
What are you working on this week?
Scrappy Little Hearts: A Finished Quilt
This little strangely shaped quilt started out when I saw Cluck Cluck Sew's heart block pattern. I know a lot of people fell in love with this block this year. I didn't really have a plan after I made the blocks.

But after I made them, I couldn't let them rest. I had other projects I was working on but the little hearts called to me.
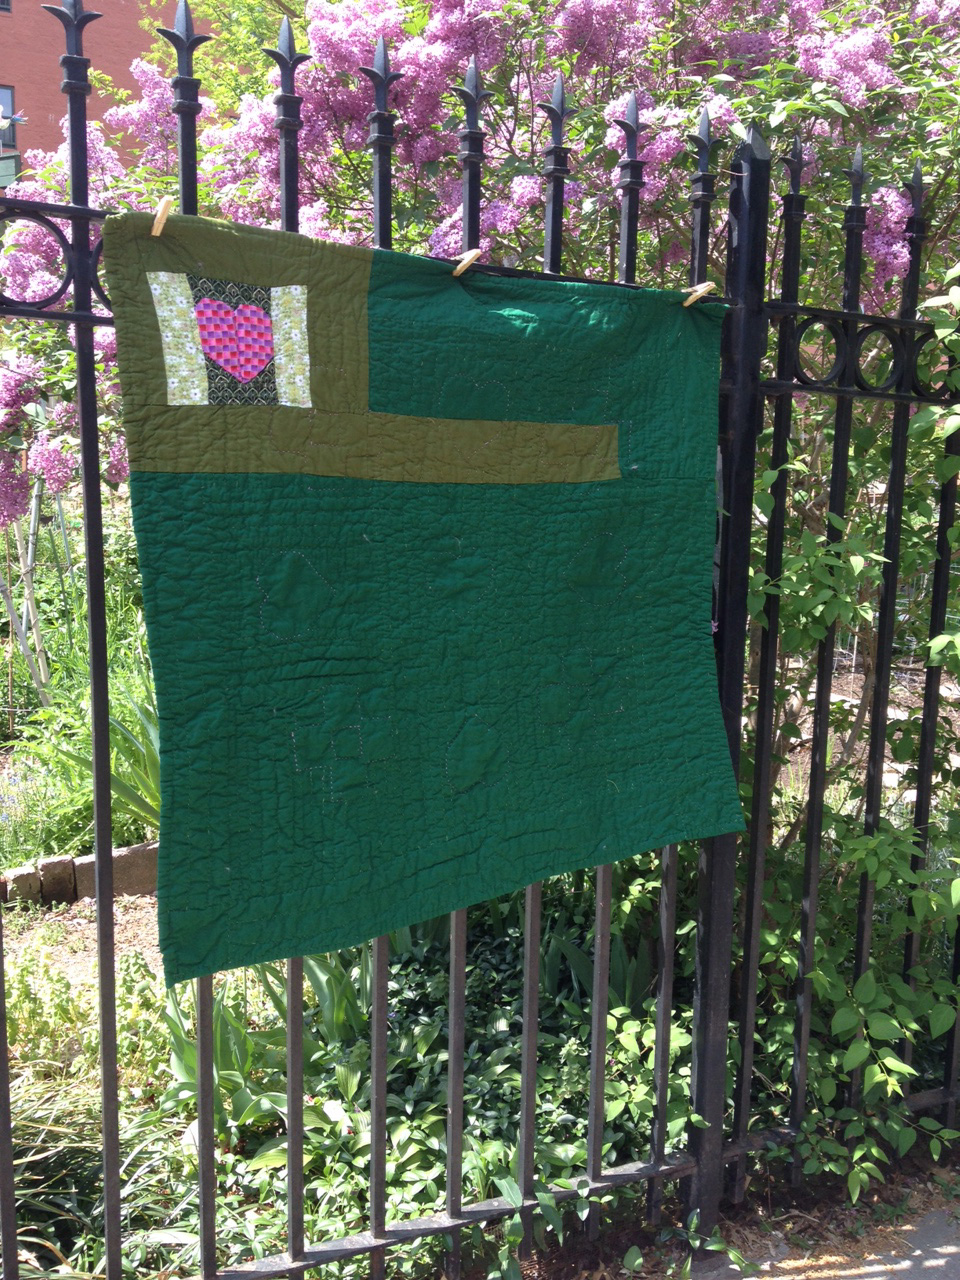
I knew I also wanted to scrap bust this year, so I pulled a ton of green scraps and started to create wonky courthouse steps around the hearts. I linked it all together with some 9 patches in purples, mimicking the checks in the hearts. The quilt was looking a little crazy at this point so I added some calming solid boarders.
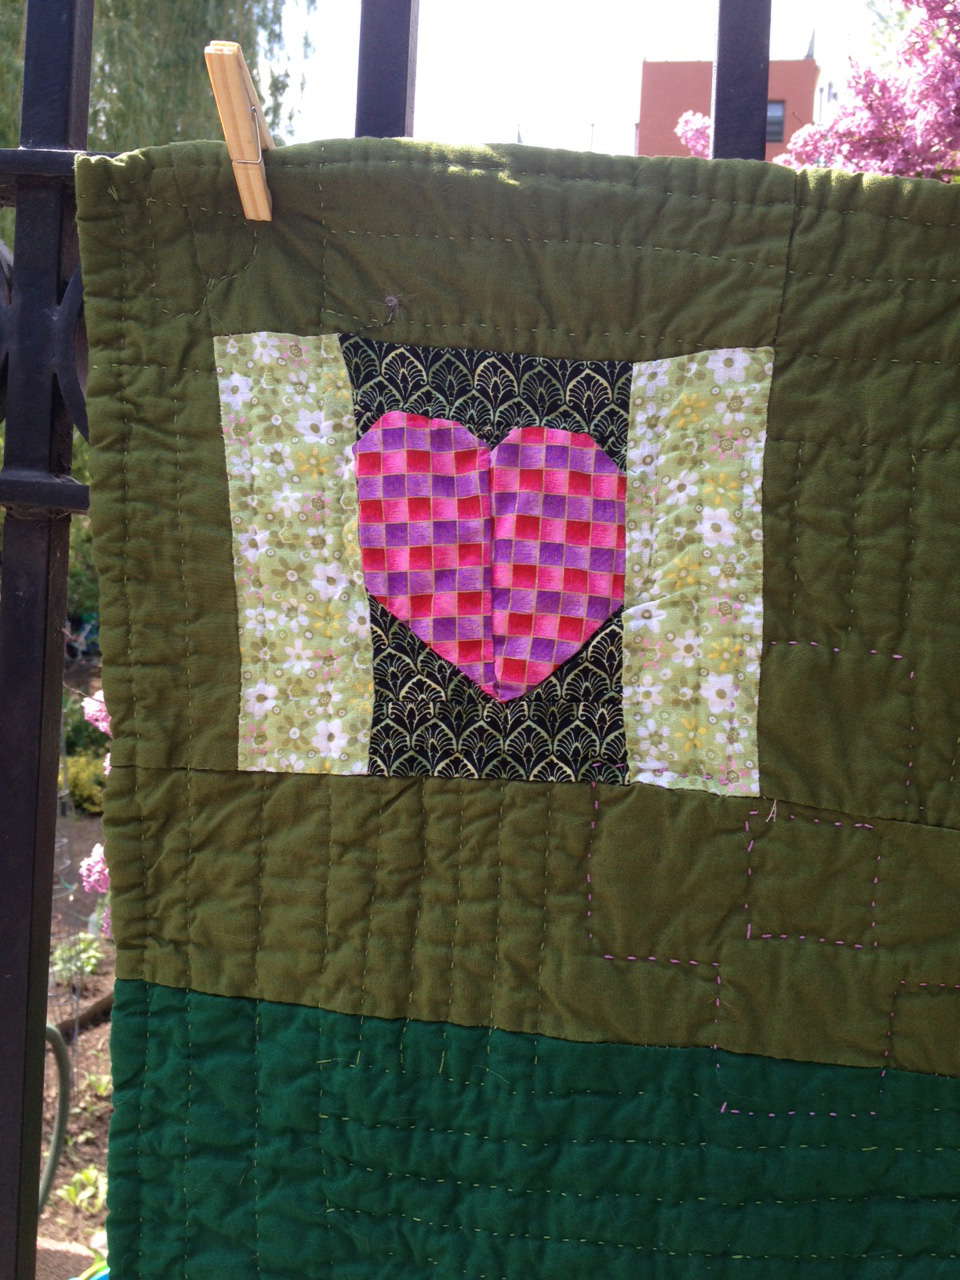
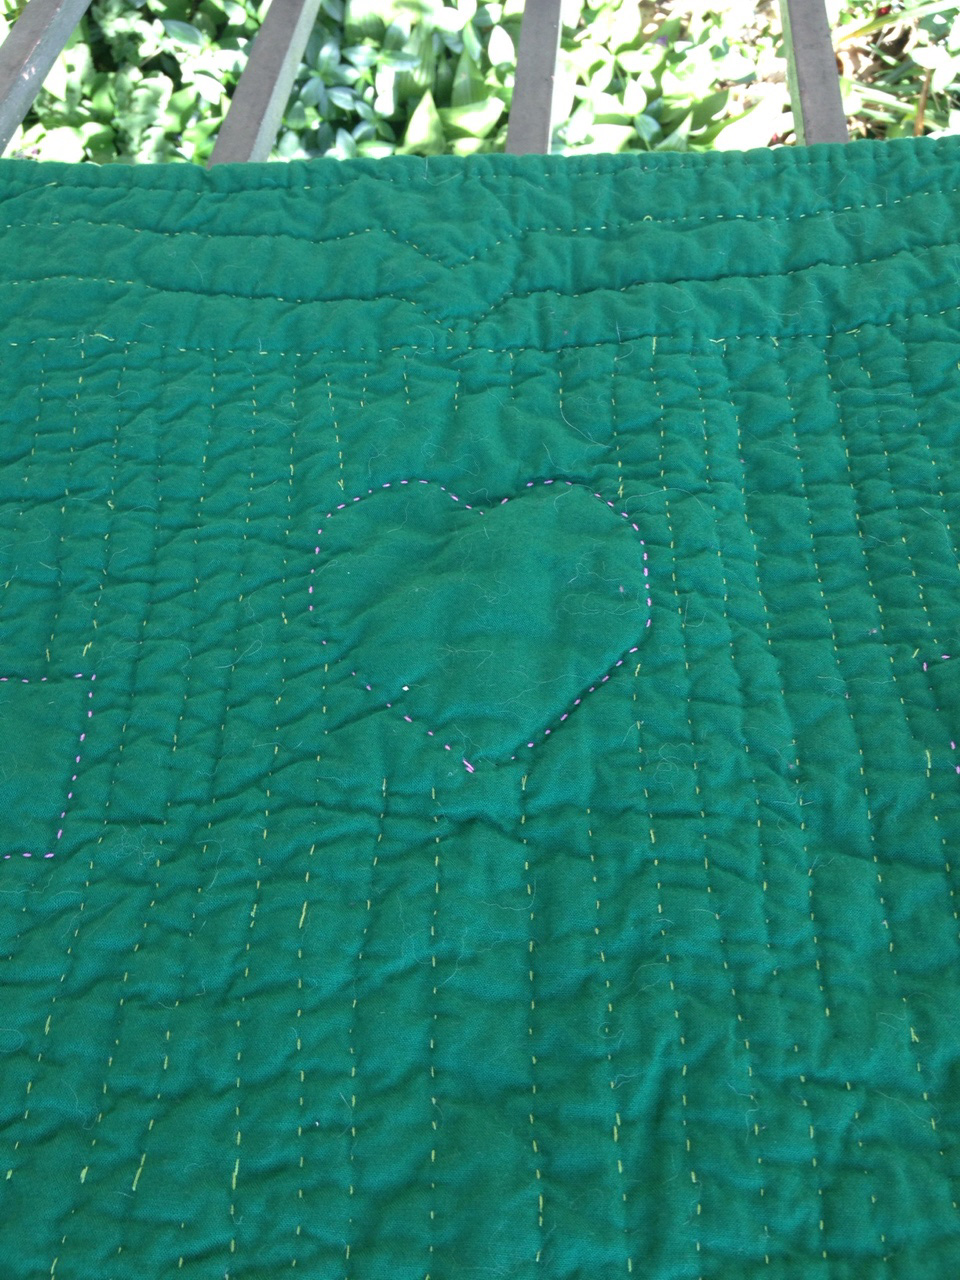
I used the last heart block, and most crooked and crazy, for the back, as well as more solids. I sandwiched top and back together with some scrappy batting. I used purple pearl cotton to go around each heart on the top and each 9 patch. Then used light green cotton thread to densely quilt the rest of the top. I embellished the boarders and back heart.
I made a thin rolled boarder to finish it all off. Bc of the improv piecing, this quilt is a crazy shape and all crooked. It kinda averages at 37" x 37" but is measures as wide as 39" in some places.
Pit was the biggest helper on this little quilt. He knows it would make a cute baby quilt, or play mat, or wall hanging.
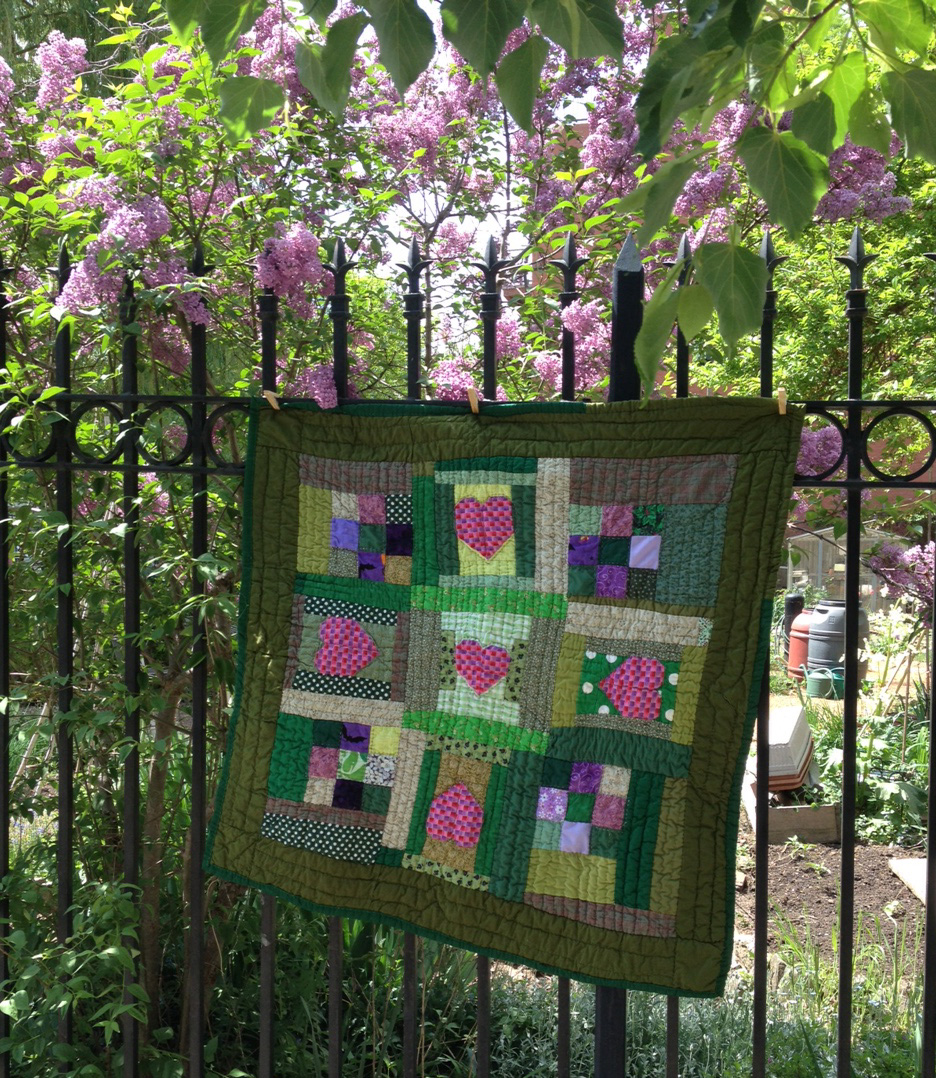
I washed this quilt and it got nice and crinkly. I was a little worried about how it would wash bc I used a bunch of different fabrics for the top. Mostly cotton but also some velveteen, and wool, as well as blends. This quilt doesn't have a label yet.

This is my first finish of Q2 of the 2015 Finish Along. I have a feeling I'm not gonna get as much done this quarter, but I'm happy with this little finish!
Something New: Scrappy Pin Cushions
I'm sure we're not the only ones scrap busting in our house this year. Sometimes this is a hard activity for me. One way I'm trying to use up scraps this year is by making some scrappy little hearts. Another is to make scrappy over-sized pin cushions!
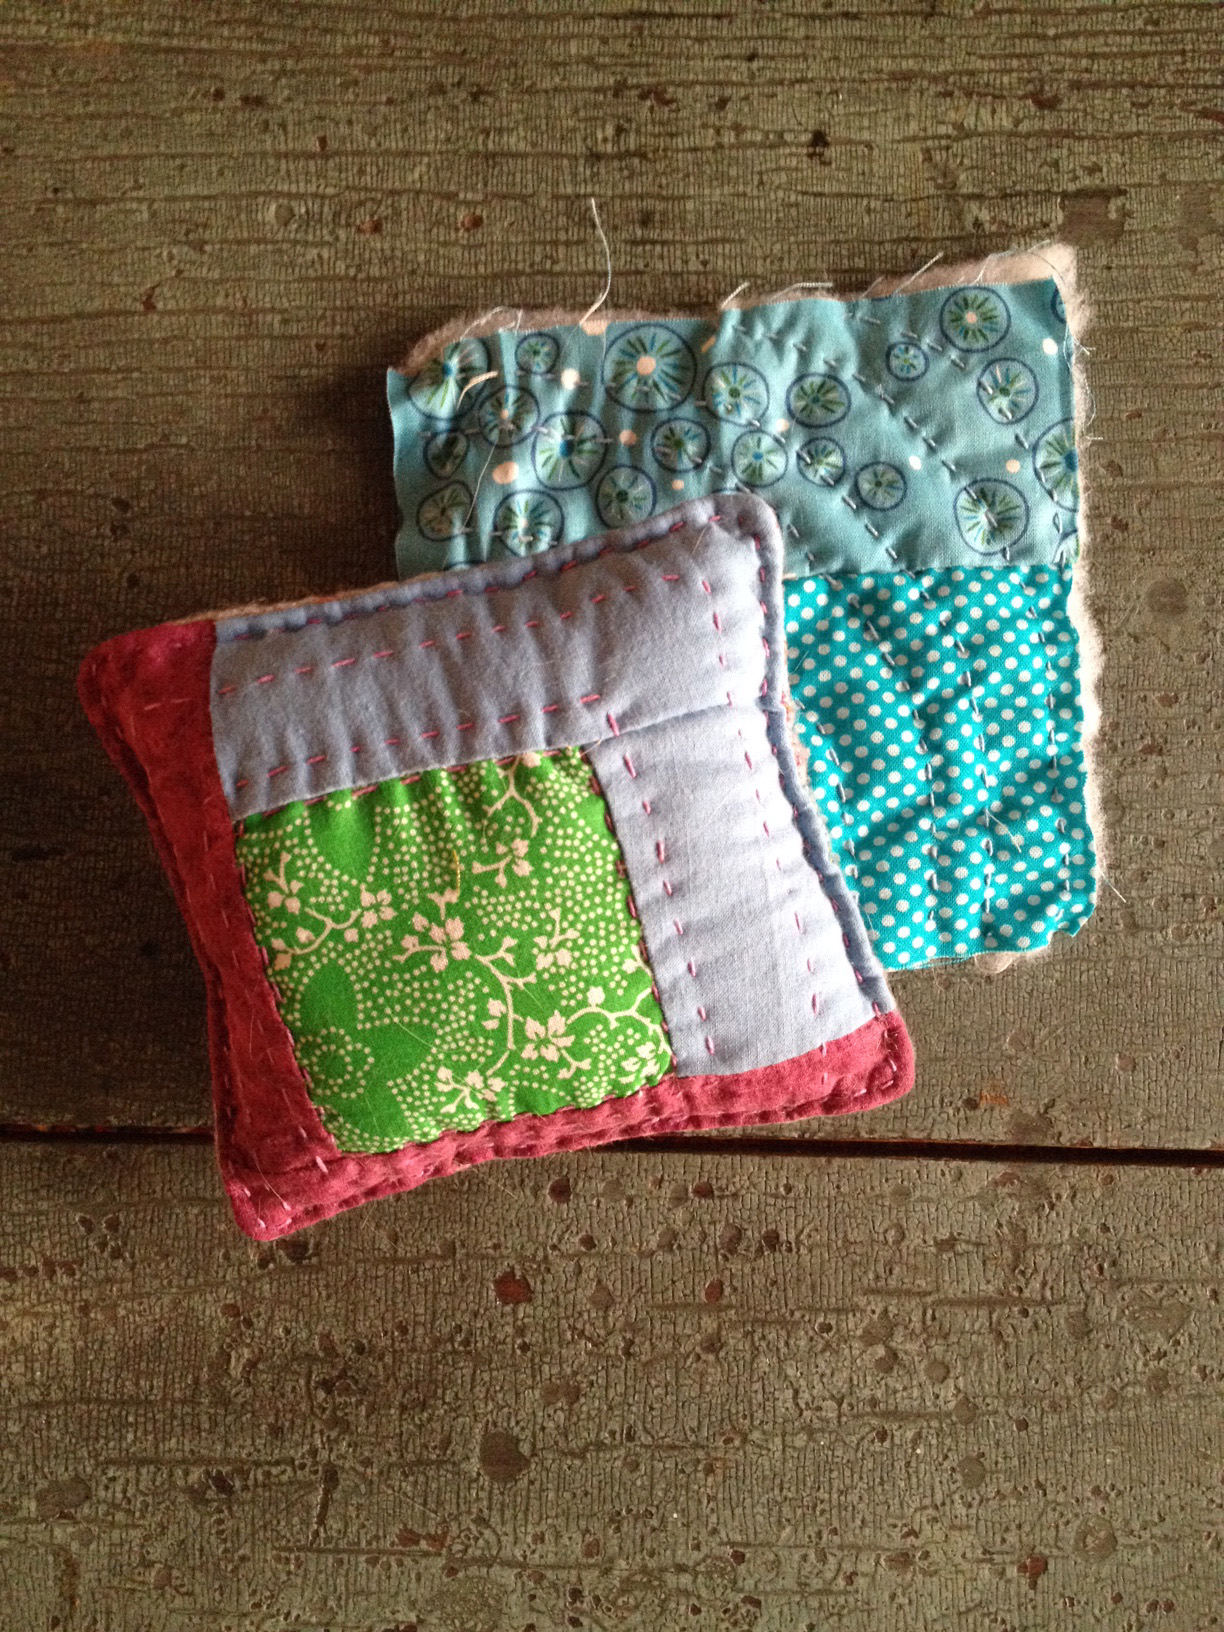
I try to pretty organically pick bits out of the scrap bins and match them together. I use a bit of scrap batting and pearl cotton or embroidery floss to quilt a quick handy design on them.

I've been backing them all with a very soft cotton flannel that came in a friends destash. In most things, I don't like the grey, pink and blue plaid, but in these it's completely perfect.
I fill them from a huge box of fiberfill that we've been working off of for two or three years... Now it's finally dwindling. I hear walnut shells are good for pin cushions.

You can see the backing peeking out in the photo above. I'm hoping that they will be fun small things to sell at the markets I'm planning this summer. But for now, they are just fun little pillows!
Label Maker
Everyone knows you should always label all your quilts.
But like many, I didn't start out labeling my quilts. It's only recently that I realized how much I wanted all my quilts to be identifiable as mine. Many of my early quilts may one day go unknown ... But that's ok, too. I kind of enjoy the idea of future people puzzling over them.

For as many quilters there are, there are ways to label your quilt. So far, my quilt labels have all been lino cuts, or stamps that I created myself. I imagine it give my quilts a punk rock jacket kind of look.
There's also a wide variety of info that can be conveyed on a quilt label. I like to keep it simple. I put the name of the quilt, the month and year it was completed, my name (well, my moniker)... and that's about it.

There's so much cat hair in the world, but I seem to have the majority of it.
I created a Pinterest Board with some lovely examples and ideas for quilt labels. I also included some stamp making ideas if you want to try it my way!
I'm adding this to my Q1 2015 Finish Along finishes. Check out On the Windy Side for more info on the 2015 Finish Along. One of my Q1 goals was to repair and label a quilt for a friend. Done!

What's your favorite technique for labeling your quilts?
On Quilting Community + Something New
Growing up, one of my best friends and nemesis was named Eleni. We were in the same homeschooling group and our moms were friends. I loved to visit Eleni's house bc she had a piano and her mom sang songs. Eleni had tall mice dolls that she made an amazing Borrowers-esque style doll house for, with acorn top bowls and stoves made out of egg containers. We celebrated cool holidays like Passover and Hanukkah. Eleni could be a brat, too, (as I'm sure I was as well) and sometimes we fought. Sometimes I was jealous of her dollhouse. We grew up and apart. Eleni became a stage actress like she always wanted. I hear she got married. Maybe she has children of her own now.
I've been thinking of her recently. She was the only person I had ever heard of with that name.
When I heard about Rachel's (Stitched in Color) daughter's difficult birth and the long, hard road they have ahead of them, I was heart broken. This is a person I've never met, will never meet and know only thru their website. I read all about how Rachel wanted more kids, and her struggles to realize that dream. She didn't write about it too much, and honestly, I never read those entries too thoroughly. It wasn't what I came to the site for. I certainly don't mind knowing about sewists lives, but I tend to read quilt blogs for inspiration in sewing.
But at some point in the last few years, while reading that site for her quilting knowledge, I became emotionally invested in her life.
I was shocked at my own reaction; a tightening of the throat, and tears welled in my eyes. The only way I can explain it is that by reading these blogs, by writing them, we have formed a community. And when one member of our community is hurting, we all are. Our community fosters inspiration in sewing and quilting, but also in living, growing, and teaching.

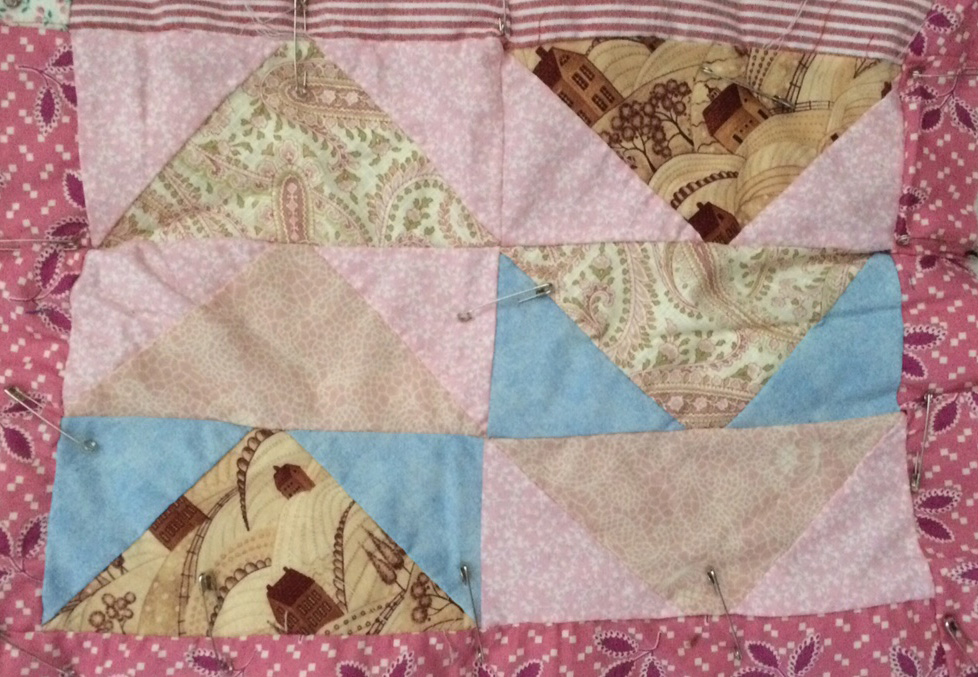
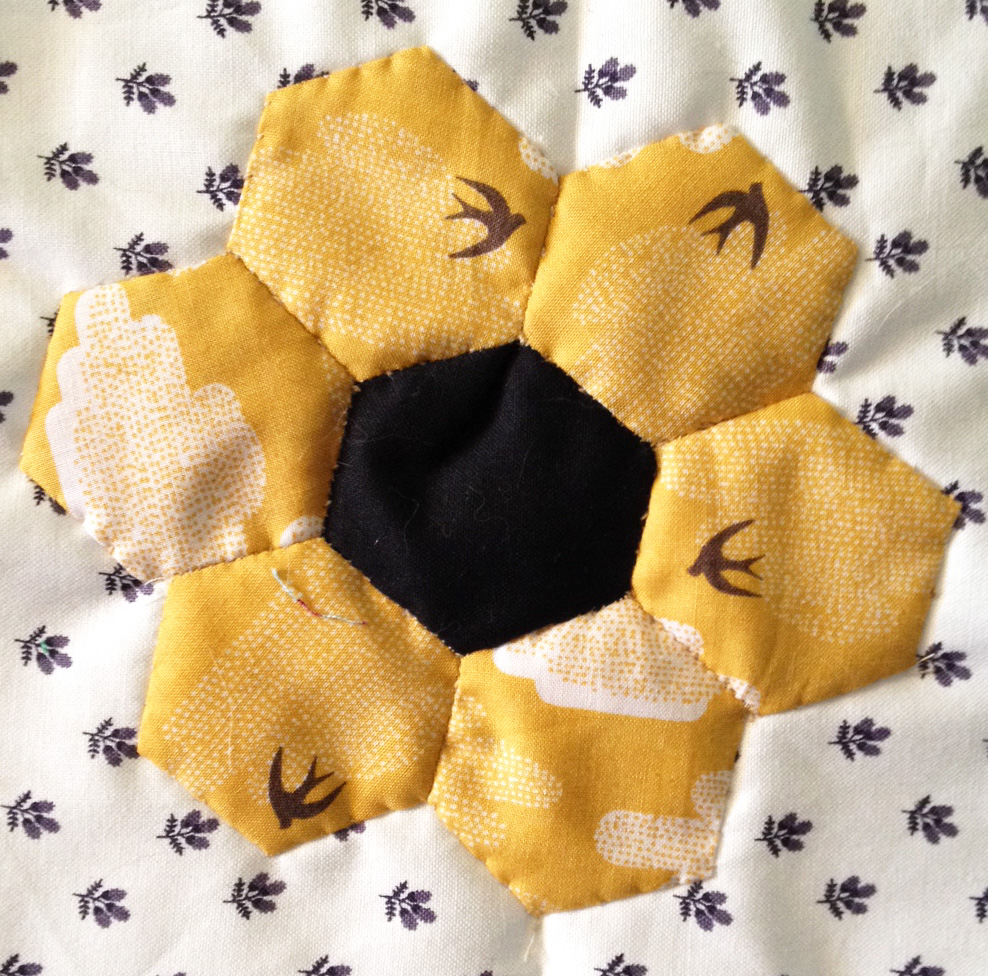
When I discovered Jodi's (Tales of Cloth) call to make #flowersforeleni, I felt compelled to join in, even tho I had only experimented with EPP, and never appliqued before.

I'm linking this Something New up with Kathy's Quilts for Slow Sunday Stitching (a little late....).
I must say, the results are not the best. Something went wrong with the measurements, I think.... And my applique is decidedly bunchy. But the intent of comfort was there and the prayer for healing. So I think they will do.

I was very happy to be able to join in and feel close to the quilting community. Just as we hurt together, we heal together also.
Stormy Friendship Star: A Finished Mini Quilt
This is the first finish I'm posting for 2015. I've had a few others but with the snow stormy weather it's been hard to get any good photos. I was able to snap a few for this when the sun came out for a brief moment.

This is also the first finish for Adrianne's (On The Windy Side) 2015 Finish Along.
I started this mini when I was working on another mini quilt top, so it's been done for many months. I used many of the same fabrics, vintage gingham, dots, and hearts, hand printed red cotton, and new anchors. I added new storm cloud fabrics for borders. I made a plain red back with a vintage floral strip. When I layered them, I realized that I had made the quilt back too small, so added some dark blue borders on the back.

I made a really scrappy pieced batting then I used cotton thread in matching colors to quilt inside the friendship star. For the rest of the quilt I used white pearl cotton. I bound the edges with the fold over method that I like. I only bordered three sides in blue, so on the finished quilt front there's one red side.
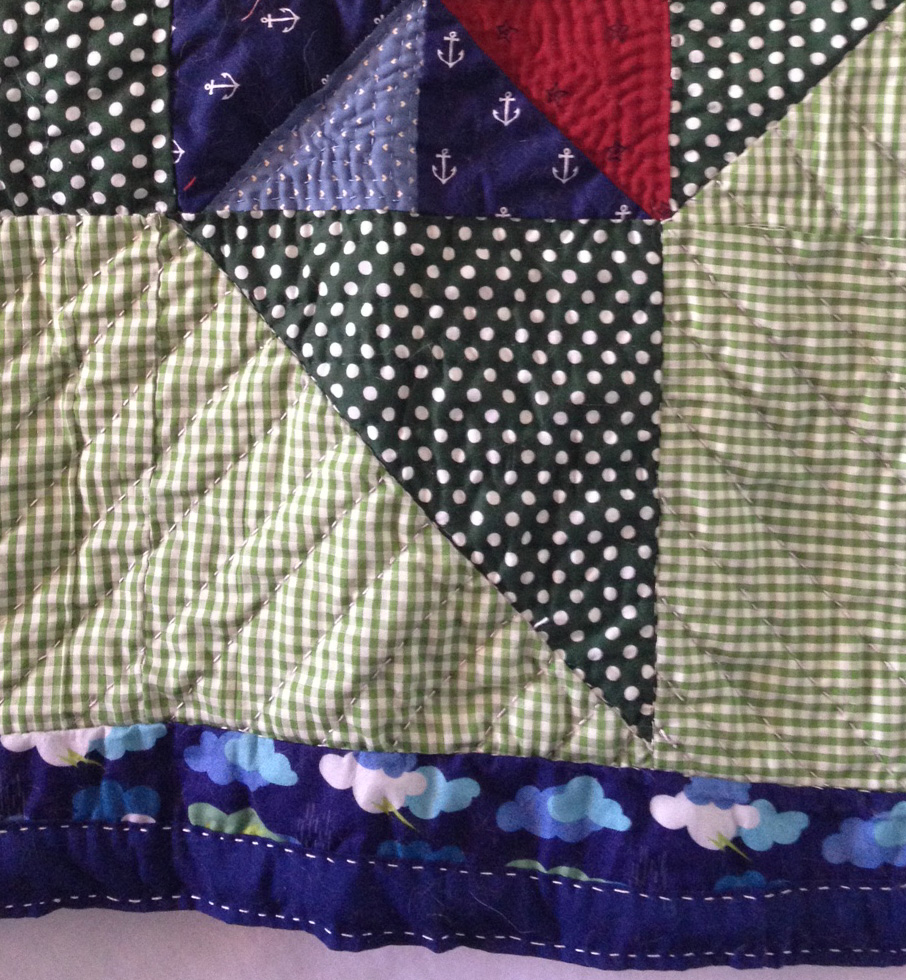
Stormy Friendship Star Mini measures approximately 29 1/2" x 29 1/2", but you can see, it's not exactly square. Is there a standard size or size limitation for mini quilts? This would be sweet wall hanging, or to drape over a chair or couch back. But it would also make a cute baby mat for a nautically inclined wee one.

Bippi was probably most helpful on this quilt. But she did get disgruntled that it was so small. She prefers a larger size quilt to really give her room to sleep under.
I'm also linking up with Kathy's Quilts today for Slow Sunday Stitching. Today she's talking about stress in stitching. Although the deadline for the Q1 finishes for the 2015 Finish Along is fast approaching, I feel pretty good about what I've accomplished the quarter. Now I just have to make the time to blog about everything!
2015 Goal - Quilting

In January, I wrote down some goals I have for the year. I only marked down my general goals. I didn't want to get overwhelmed! I think it would be good to expand on each of the main topics. There are very specific things I want to accomplish within each goal section.
I'll be breaking down what I want to get done for each goal over the year and posting updates.
The first goal I want to address is Sewing/Blogging.
Here's what I originally wrote:
Sewing/Blogging - More sewing and more blogging about it! I want to work on my online shop. I must do one market, or fair.
What's pretty straight forward about this goal is that I want to sew more! All the time if I can. So that's the first big step.
Here are some ways I can do that:
+Get out all my WIPs and get things finished! Like other quilters/sewists, I love to get things started, try out new ideas, and get easily distracted by all the pretty fabrics! But I also love to put the finishing touches on my work. In a lot of ways, I like it even better bc I know that this thing that I made can now get used!
+Set up trades, join swaps, get ready for markets. Just generally get more motivated to work, work, work!
+Join in. I have already joined Adrianne's (On The Windy Side) Finish Along. And I plan to join in more with the quilting community this year, both online and IRL.
+Generally make sewing, and my artistic endeavors, more of a priority and focus in my day to day life. How this will happen, I'm not sure... But I have a whole Goal dedicated to it, so look out for updates.
Along with the above, there are some new fun quilty/sewist things that I want to do or try this year:
+Print my own fabric. I have been wanting to do stamping or screen printing on fabric for a while!
+Learn new blocks. I've been taking screen shots of so many blocks lately! I have to start a pinterest board just for them!
+Do some dying. I'm so inspired by dyers (like Folk Fibers)!
I feel like all these things and more will help me sew more.
Next up is blogging. I have been trying to make blogging a priority recently. I want to blog/update more regularly and read/comment more regularly. Join in, right! I've thought of some ways that might help me blog more:
+Set a time to to read blogs, set a time to write blogs. I usually check the computer before I go into work (unless it's one of my early days). I get my coffee, check out my favorite blogs, and pet the cats. This isn't such a bad routine. But sometimes, I'm short on time, I'm also writing work emails, I'm thinking about other things.... etc... Sometimes I write something, sometimes, I don't have time. I think it would be helpful for me to make the effort to get up a little early on "blog" days, stay focused and make an agenda of what I want to get done. Maybe plan to check blogs 4 times a week, and write blogs 2 times a week, get up early on those days, carve out that time and give it the care and consideration of work (not just lazing in front of the computer).
+Comment more. If I'm reading blogs 4 times a week, I should make sure to comment at least once a day.
+Set content. A lot of the blogs I love have set entries that they write every week. I love Reading My Tea Leaves' column My Week in Objects (Mostly), Little Green Shed's Nature in the Home, and of course Kathy's Quilts Slow Sunday Stitching. To name a few! I want to come up with a few things I would like to write up every week. I'd love to hear ideas from my readers!
And the last part of this goal for me (for now) is selling. I don't make my work to sell necessarily, I make it bc I love to make it. But I like the idea of selling my quilts, sewing, and arts. One of the things I enjoy about sewing is making things that are useful. I want people to enjoy and use the objects that I make. I love to see family and friends using items I have gifted them, but I would like to reach as many people as I can!
+Update my shop more often. This is a no brainer. I have to stock my shop, and keep people updated on what's there!
+Do giveaways and collaborations. I have a few giveaways planned for this year. I am in talks with a few artisans about some work we can do together.
+Sell at markets. I have some leads on this, too. It's hard for me, just starting out, to psych myself up for this... but I have to make this commitment!
+Expand my social media network. I'll have a post about all the places you can find me soon.

So I think that covers a lot! I have a lot of plans and goals for the year where sewing and blogging are concerned, and I'm excited.
It helped me a lot to hear other peoples goals for the year. Does anyone out there have some sewing goals for 2015? Share them in the comments!!
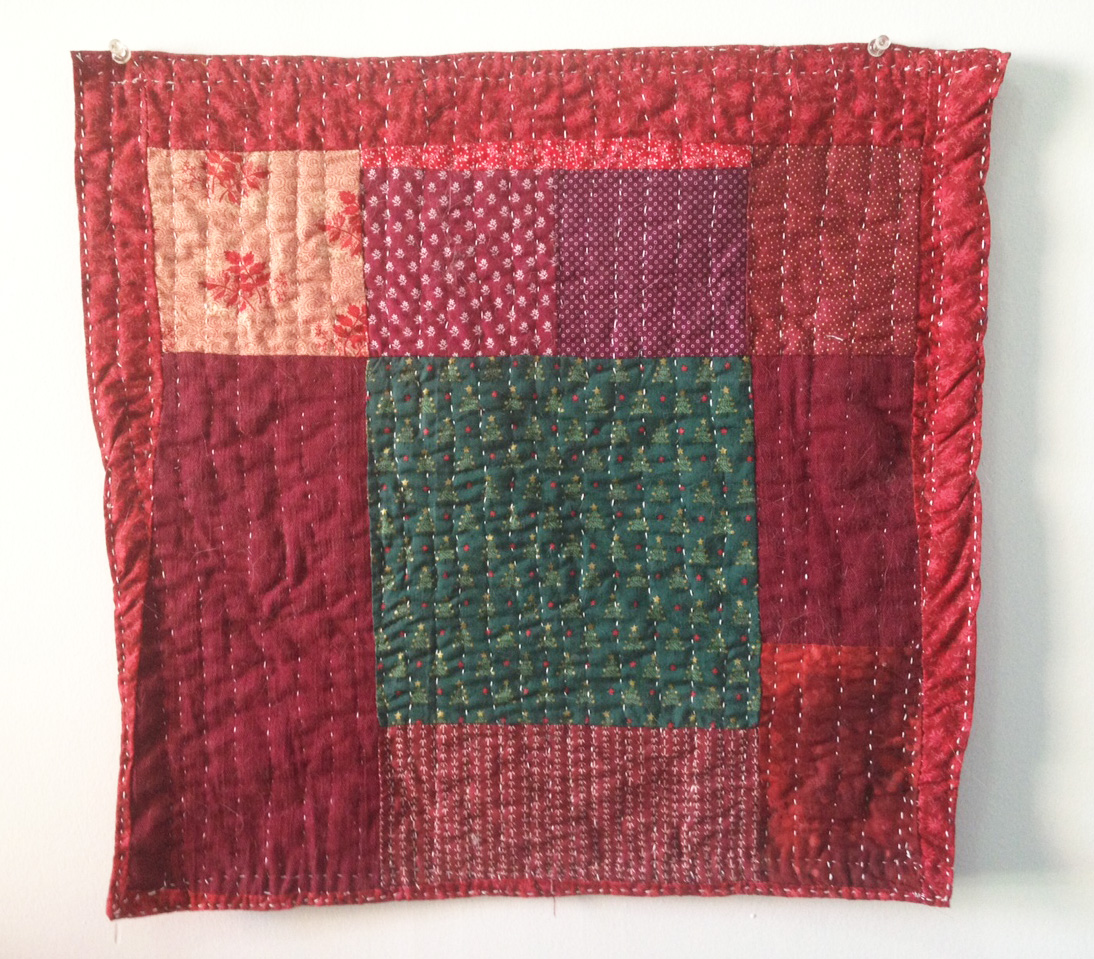
Belated Xmas Finishes

Four Trees mini mini quilt.
In November of 2013, we went to visit our Family in Tennessee. I had the idea that I would work on some mini mini quilts (table toppers. mug rugs, wall hangings, what have you) to give for xmas that year. I sewed diligently before hand and on the plane, but I couldn't finish them in time. When I did get them finished that xmas was over and the mini minis were far too Christmasy to give as late gifts. So I held on to them, and they were wrapped up for xmas 2014!
Back of Four Trees.
I made Four Trees specifically for my Mother in Law. It was the piece that I tried hardest to finish that year, but alas it wasn't meant to be. I used as many favorite scraps of red, xmas themed greens, and blues as I could find. The binding on the back got a little wonky. I used scraps of batting and quilted the mini densely with white pearl cotton. The only thing I added before gifting was a small label (which does not appear in the pics as they were taken way back at the beginning of 2014). This very small mini measures approximately 19" x 18 1/4".
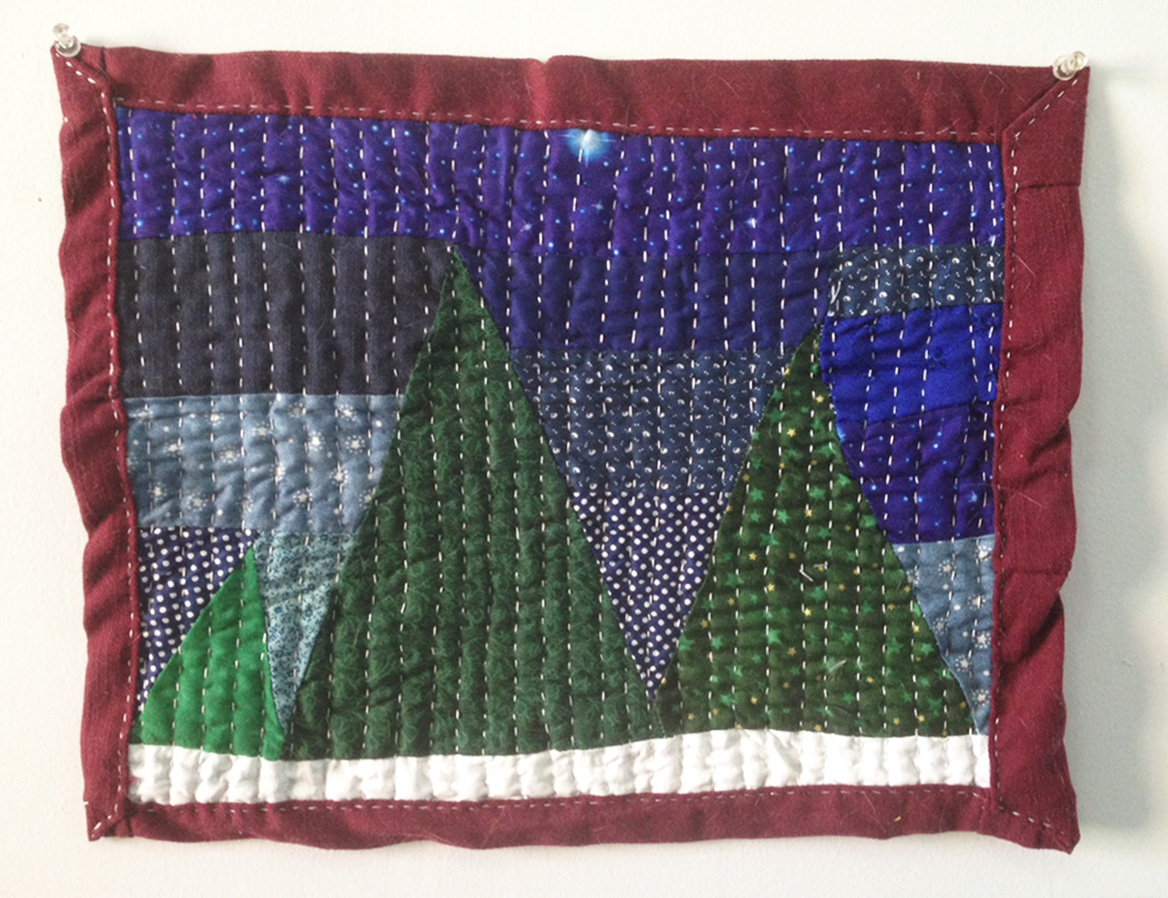
Night Trees
Night Trees is an even tinier mini I made for my Aunt using much the same techniques. Although these minis are xmas themed and red and green, I tried not to make them too much about the holiday and more about the solstice. Night Trees measures approximately 16" x 12 3/4".
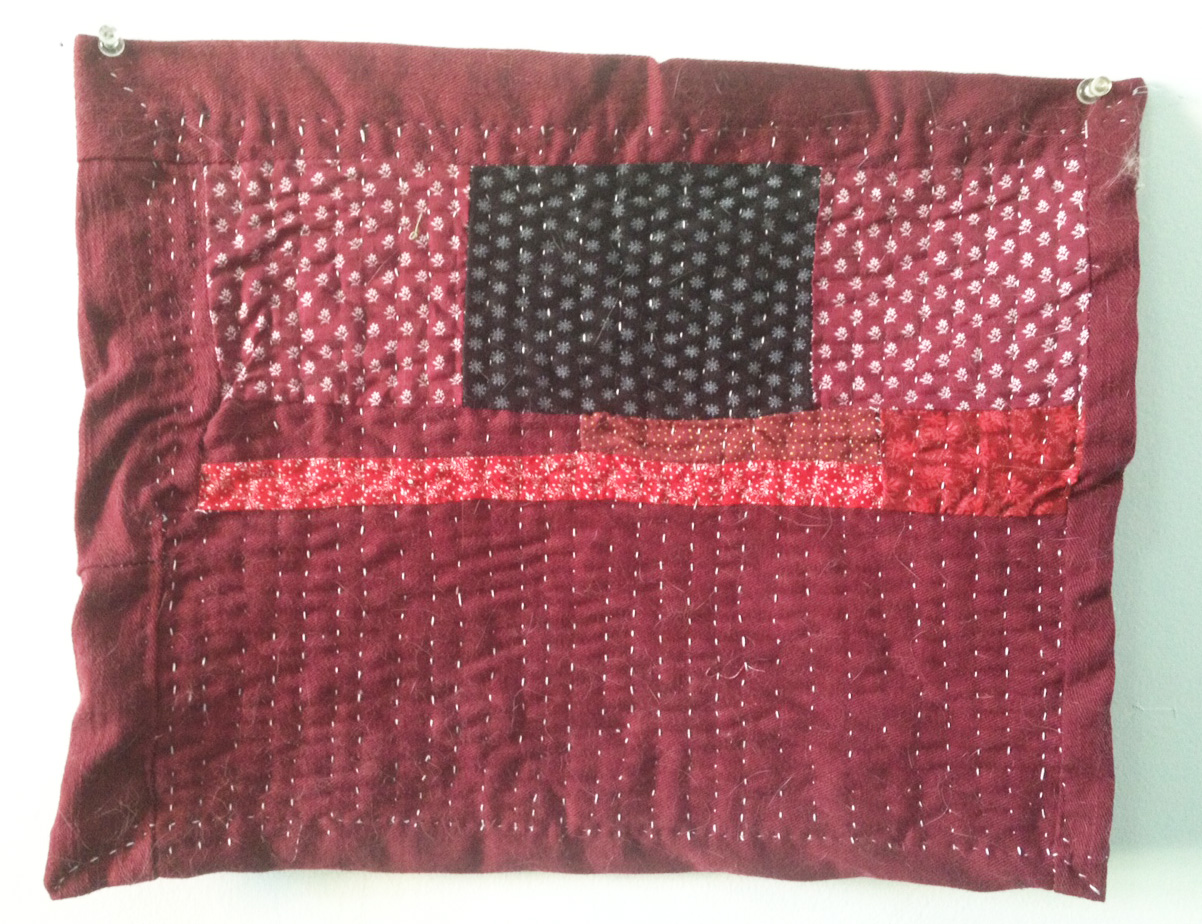
Night Trees back. Pardon all the cat hair in these pics.
I took all the pics shortly after they were finished in early 2014 and didn't look at them again until preparing for this post. If I had, I might have taken some more shots before they got wrapped. I hope everyone who received them as gifts enjoys the quilts as much as I enjoyed making them!

One Tree.
One Tree mini mini quilt is the smallest and most bright and was gifted to my Grandma. Most would consider this a "mug rug" I'm sure. I've never been entirely clear on what those are (over sized coasters?) and I like my work to have multiple uses, so whatever works, works. I'll have to see what my Grandma comes up with for it.

One Tree back.
One of my first finished small pieces was a wall hanging using scraps of batik fabrics. I put various strips together and backed them with a mostly cream backing. I quilted it with cream embroidery floss in a diagonal pattern, and added little hanging loops. This piece moved around the house for a while and I thought to put it up on one of our doors. But I never felt quite right about it for some reason, so it never got hung. When I pulled the xmas minis out, I rediscovered it and thought to give it to my Sister in Law. That idea felt right!!

Batik Wall Hanging.
As well as these, some other hand made gifts were given this year. I felt very happy that many of our gifts were home made, and that much of our time in 2014 was used creating, not shopping. I hope to keep that tradition up, and that more and more of our days are for making things, for ourselves and for our families and friends.
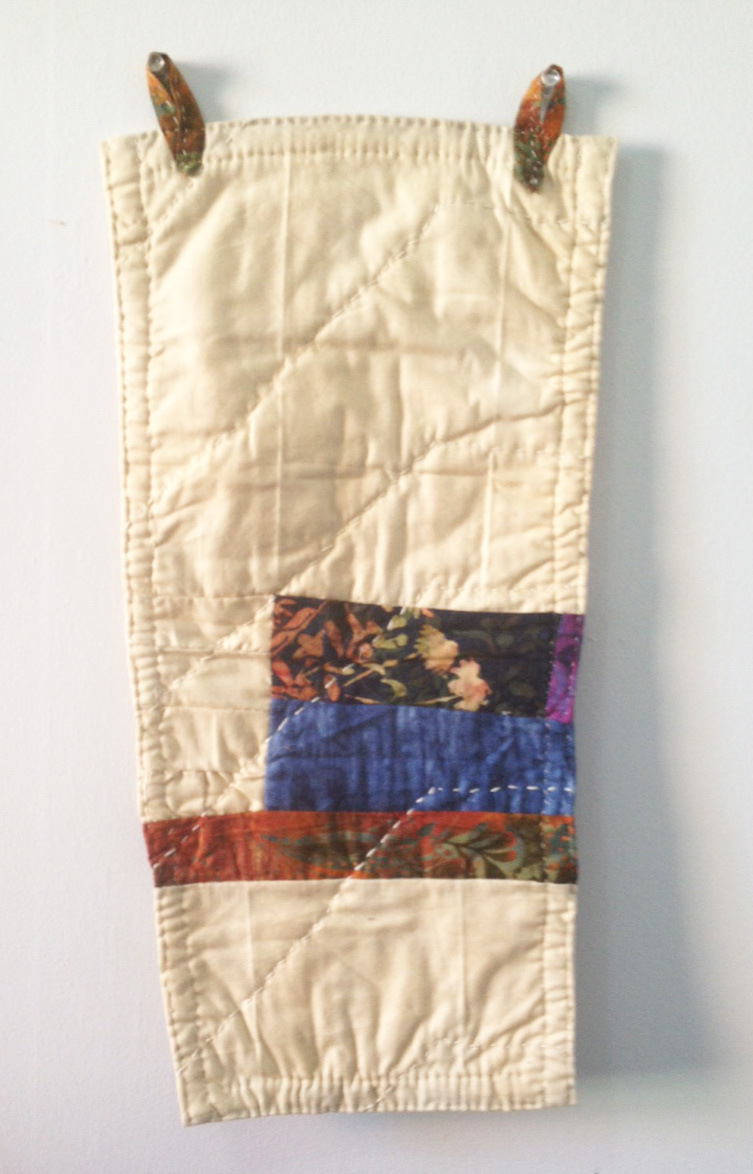
Batik Wall Hanging back. I struggled with the little loops for this wall hanging, but ended up liking them.
I hope everyone enjoyed their 2014 xmas season and has a happy and healthy new year!
Mat Finish
I can't even tell you how long ago this finish was started. It must have been several years, at least. But in early December 2014, it was finished!
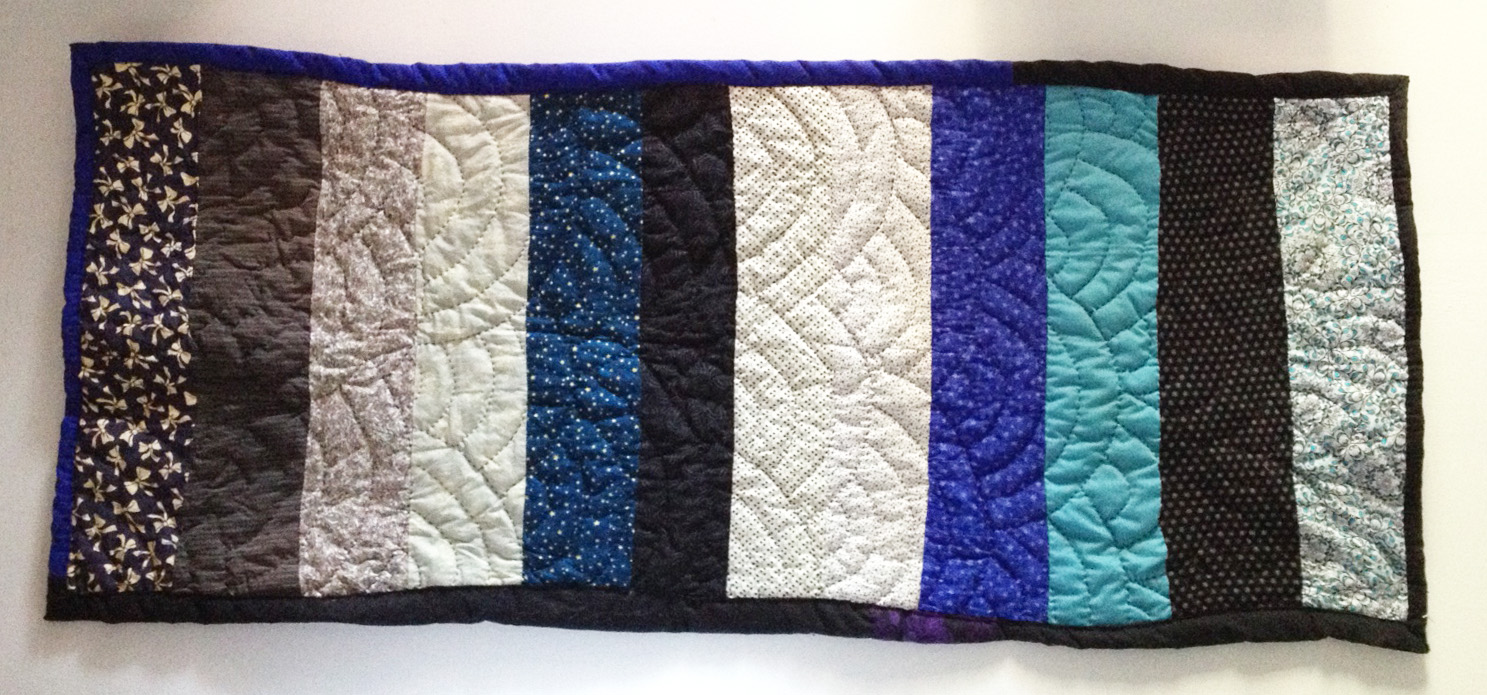
As I dimly recall, this "quilt" was started by just having lovely pieces of fabric near each other and the uncontrollable urge to sew them together. I remember that these were sewn together long ago with no real plan. And I remember later forming a plan to make an insanely long quilted strip of pieces like these. That plan never came into fruition, and the top for this mat was left to the WIP bin. After being bagged, un-bagged, tossed around, etc... It eventually made it's way to a chair top for many months where Flounder became quite taken with it.
A few months ago, I cleaned it up, tried to get as much of the cat hair off of it as I could, made a back for it, and basted it. Then it sat in a new WIP pile, for a few weeks, and was later quilted while my friend was in town.
I had been looking for a project to do a fan style quilting on and this was perfect. Having never used a fan design, I was worried it might be hard, or slow, so starting with something small was great! The quilting actually went surprisingly fast. I used acrylic black thread for quilting the fan designs, and I think that made a difference. Acrylic really glides thru the quilt as opposed to natural thread, whcih sometimes get caught or travel slowly. The hardest part of quilting this quilt was that some of the fabric is quite dark and made it hard to see the stitching while sewing.

The fabrics in this quilted mat are mostly new from various fat quarters, but there are also some recycled clothes and a bit of vintage. I pieced the back with most black, some old but not vintage stars, and a bit of vintage purple which was also a backing on another quilt. The batting was also a left over scrap. Since my quilts are never any particular size, and certainly not a standard size, I seem to always have batting scraps laying about. I folded over the backing to make the binding but only did one line of stitching, where I usually do two. This is partly laziness on my part, but also I envision this quilt to be super soft and easy to fold, roll, and carry.

This mat quilt is approximately 50" x 22", Which is a pretty weird shape for a quilt. I see this quilt being small and portable and taken where ever you go. It can be used as a mat for yoga or exercise, taken to the park or beach and used as a seat, folded as a chair mat or to give you a little extra back support, laid out for a cat or baby mat. It could also be used as a table/dresser topper or bed runner, but I picture it being more versatile and utilized. It's really soft and a little puffy. I really love the way the fans are very clear and noticeable even though sometimes they are black on black.

I still have to label this quilt and write up it's entry in my quilt journal. But it was very satisfying to finish such an old WIP!! It definitely made me get out my unfinished works and assess them for potential finishes! It was also nice that this quilt had some firsts: First oddly shaped finished quilt and first fan quilting design.
I'm linking this post up with Kathey's Quilts for Slow Sunday Stitching.
Friendship Mini: A Finished Quilt
Right on the heels of making my first friendship stars, I started playing around with the scale of the stars. And this mini quilt was born!

This quilt has a name and was made for someone. But if I revealed the name, it would give away the surprise!
This mini measures approximately 31" x 31" and the star is about 25" x 25". The center of the star has vintage heart fabric and new anchor fabric. The points are the same vintage polka dots that I backed the First Friendship Quilt with. The background for the star is vintage green gingham. The sashing is a new dark blue fabric with multi colored bubbles.
The backing is a deep green floral/paisley that was a gift from a friend. It has stripes of the same anchors and bubbles from the front. Both are new fabric bought on Fabric.com, I believe.

I did a lot of hand stitching with light blue pearl cotton in and around the star, but left the dark blues un-quilted. I used my fold over double stitched method for the binding. I like how heavy the quilting is, but there are still areas that are blank.

I'm pretty sure that I used a scrap of batting left over from the First Friendship Quilt for this mini. All the quilting makes this one pretty snuggly. It would be perfect for a baby quilt or baby mat, and it makes for a nice pet quilt, as well.
Tom was most helpful in the making of this quilt. Bippi wanted to help, but it was too small to work on and have her sit under, so she was mostly just annoyed.

I haven't labeled this mini, yet, but I have washed it. It's very soft and supple. Unfortunately while taking these photos, I noticed that the binding did not catch in one part of the quilt!

I knew I was cutting it pretty close, but I've never had this happen before!! So, along with a label, this quilt will need a little repair before it heads to it's new home.
Since all my quilts are hand pieced, basted, quilted and bound, I like to link up with Kathy's Slow Stitching Sunday when I can!
A Finish in August
Finally!
Stars for NFG 2014 (quilt for Crimson)
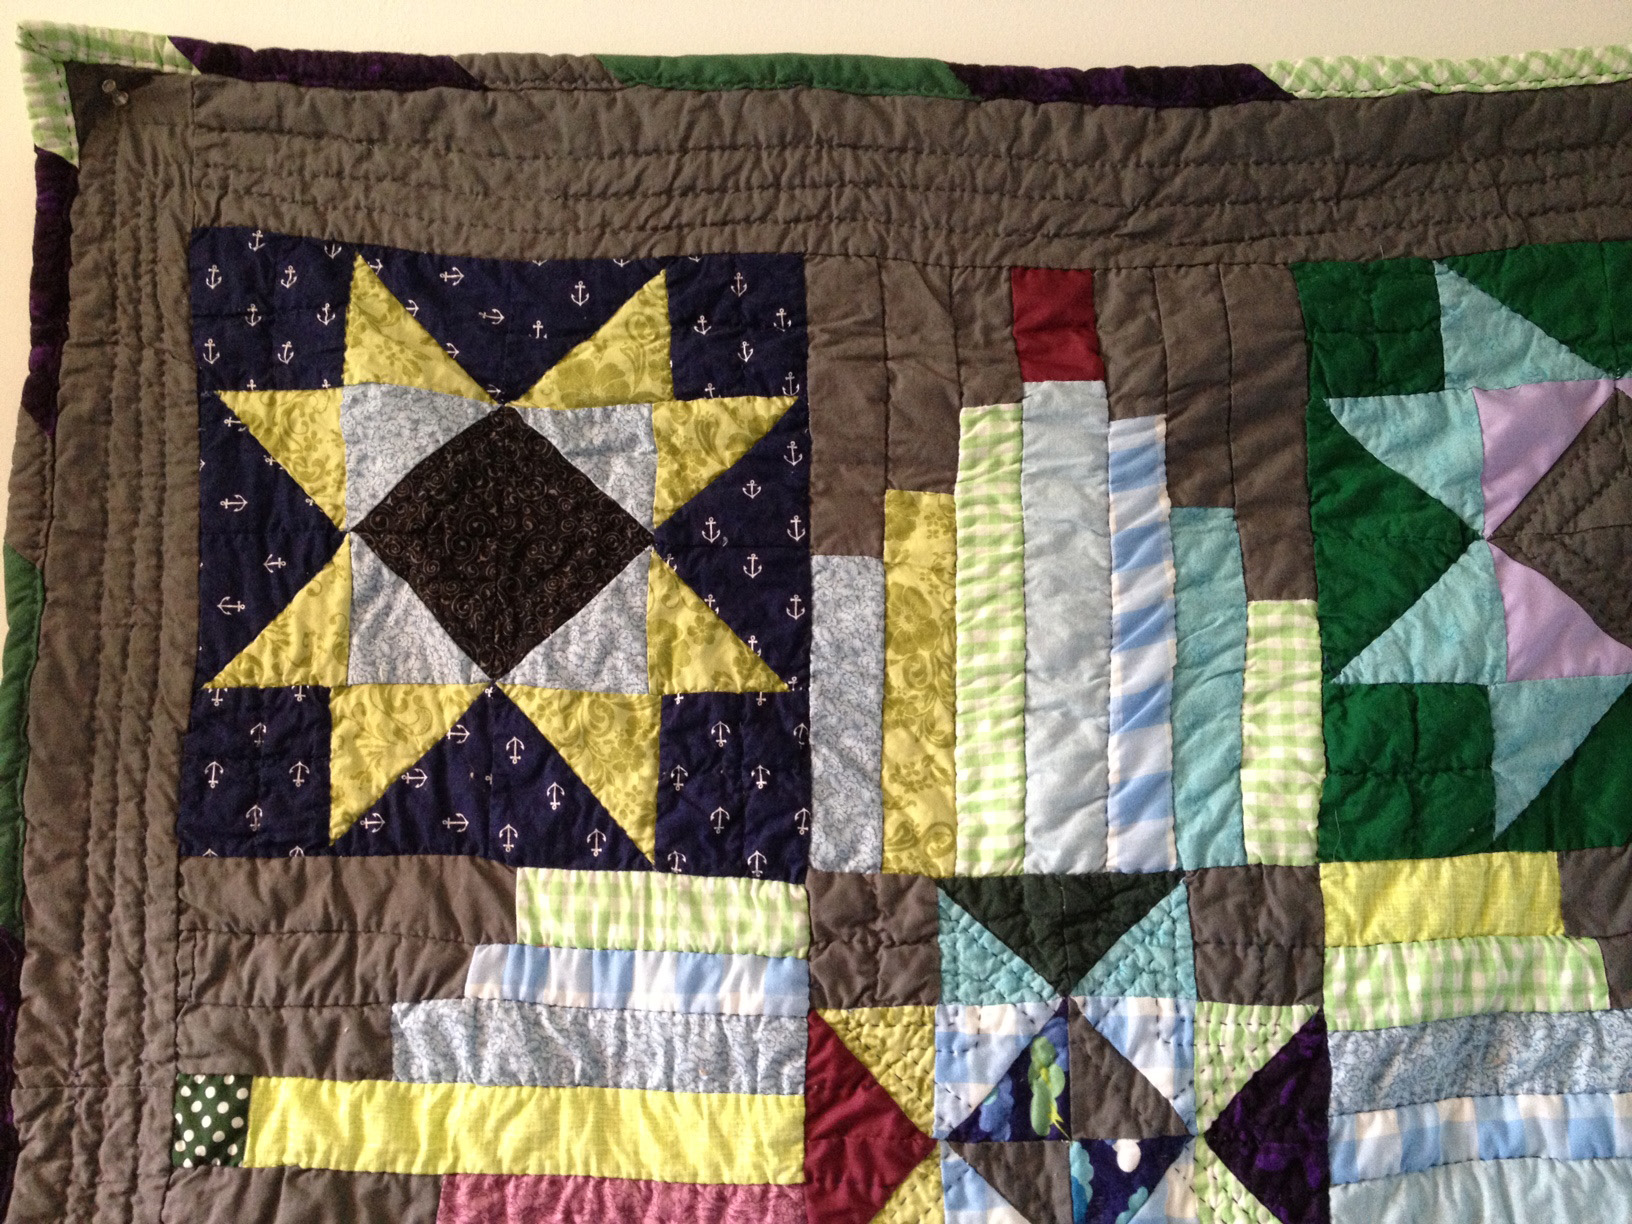
Front detail.
My last finish was way back in February of this year, and that's too long ago!

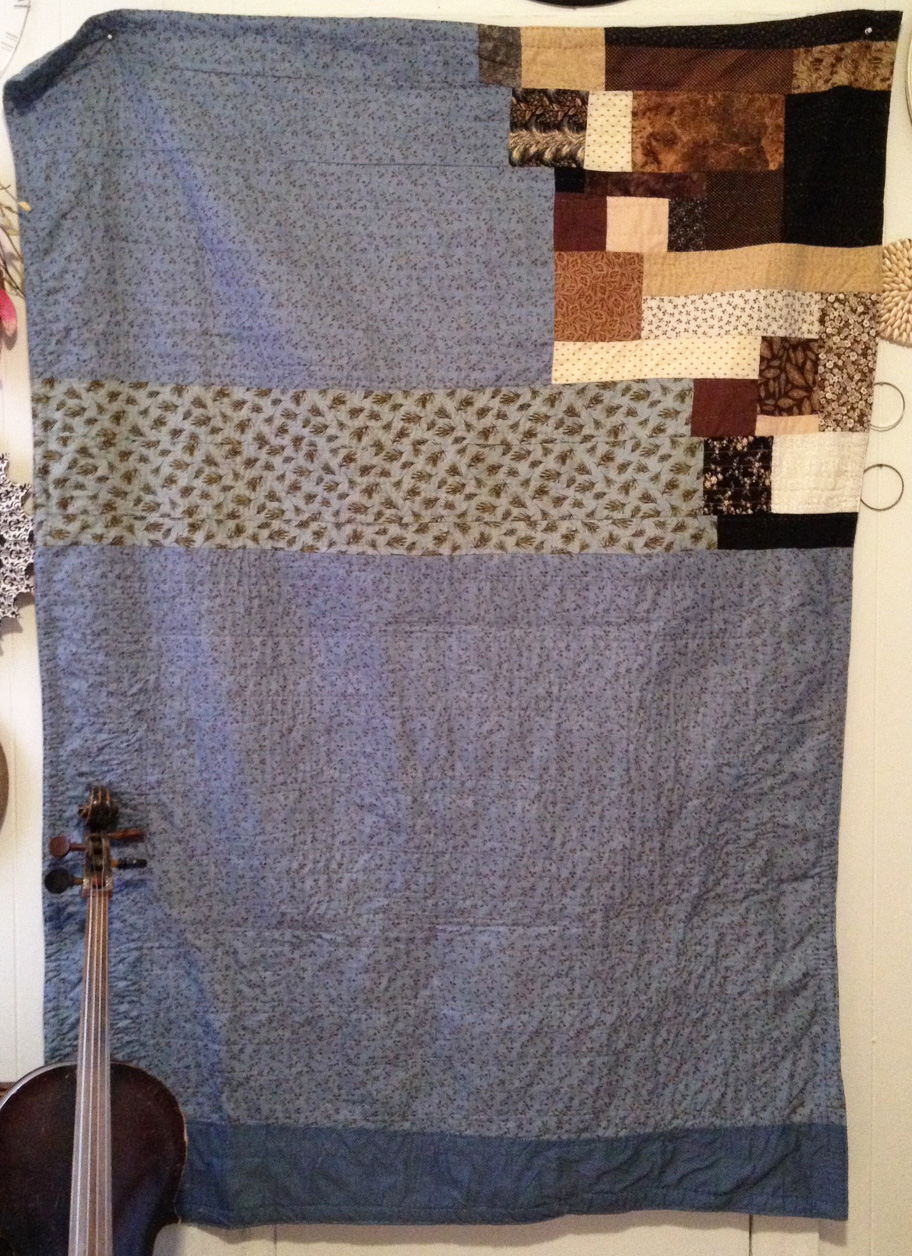
The back.

Back detail.
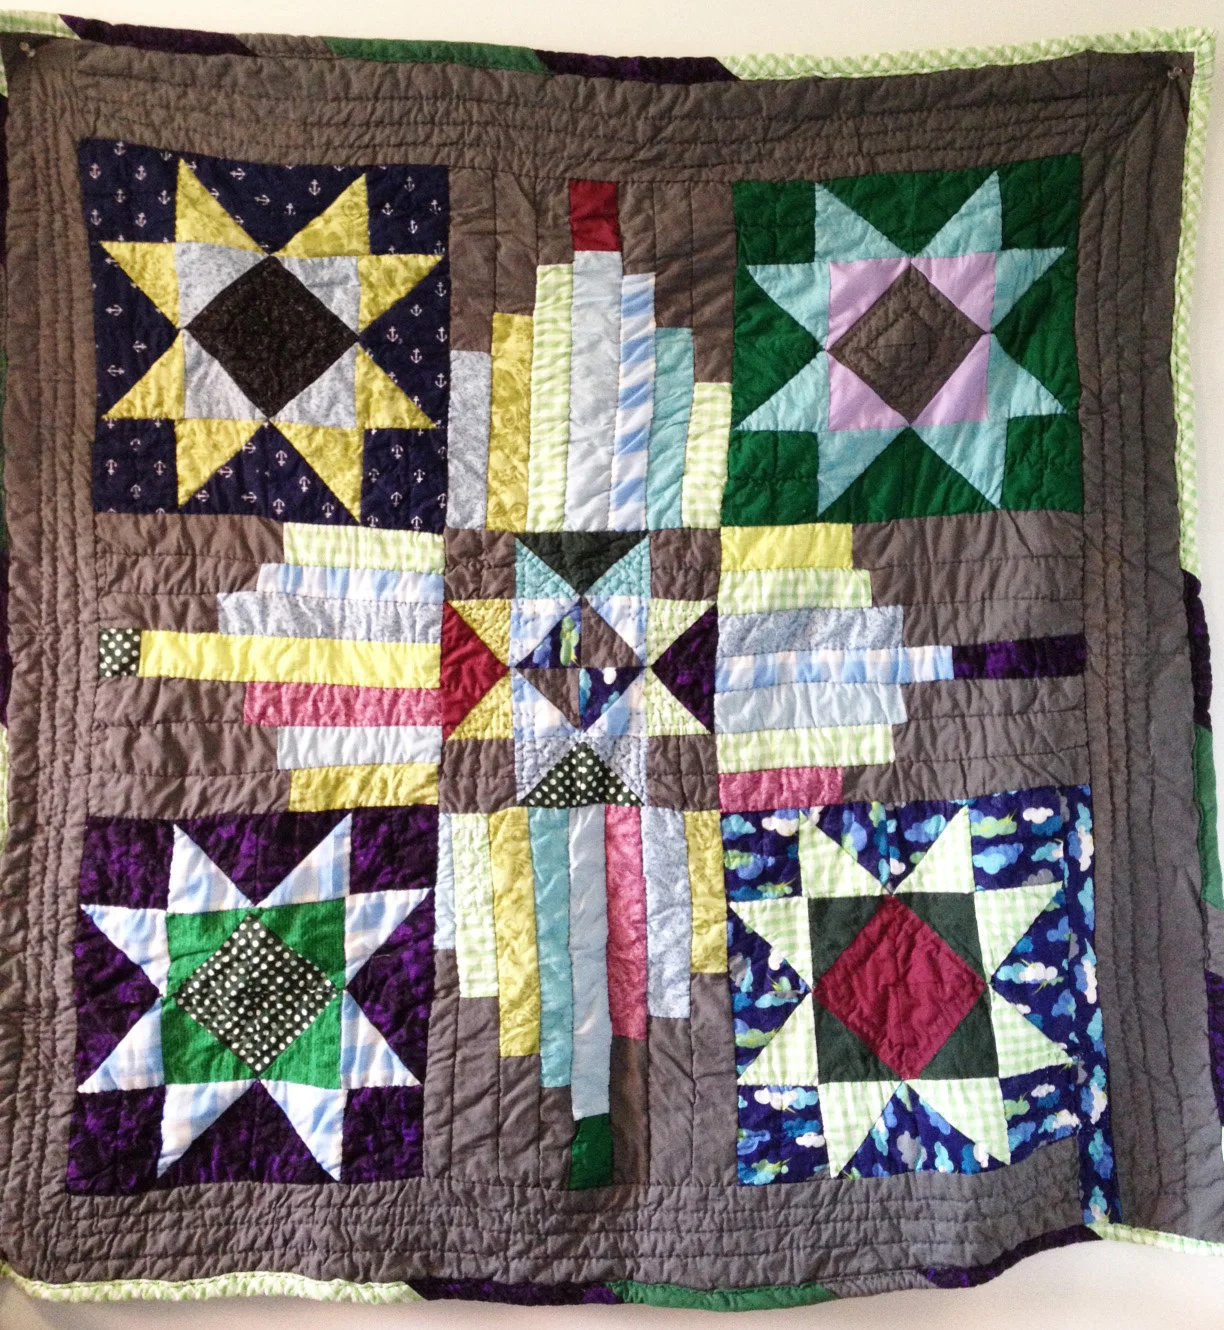
Stars for NFG 2014 (quilt for Crimson) is my version of a baby quilt. It's quite large but I forgot to measure it! I'd guess it was about 55" square, so large enough for a lap, or small throw, but great for a baby mat or snuggly small child blanket.
I knew this quilt was for a baby boy, and although none of my quilts are gender specific in my opinion, I tried to make it a bit more boyish. I'm not sure it worked, exactly, but I like how it turned out. I also felt like my usual more muted tones would be too drab so this is my attempt at "bright" colors.

Center star front
I'm going thru a traditional quilt block phase, and this is my first completed quilt using a classic block. I believe it is a variation of a sawtooth star, but quilters, correct me if I'm wrong. I made the four large stars first, then used the scraps to create the middle small star. And then I realized that if I didn't add some neutral solid fabric the quilt would just look like a messy jumble. I used one of my favorite go to grays (Connecting Threads Charcoal). to balance out.
Besides the gray, there is a mix of new and vintage fabric in Stars For NFG. All the gingham is vintage from various places and finds over time, as well as the light blues, rich green, and purpleish strips. The green dots and deep purple are from the same great ebay lot. All the bright greens, blues and teals, are parts of FQs from my favorite quilt shop in VT.

The vintage gingham had some flaws and one became a tear. I patched it using a smaller piece of the same fabric.
The back is mostly vintage green gingham with a diagonal patten using deep purple, rich green and charcoal gray. The purple and green backing is a nod to my favorite band who I've been to see with the baby's uncle.

Back of center star.
I used a new cotton batting and dark blue cotton thread, doubled, for the quilting. I stitched in the ditch for most of the front of the quilt, except inside of some of the stars and the borders. The back really shows the quilting bc it is light colored and mostly one solid piece of vintage green gingham fabric.
I rolled the back over and quilted one line of quilting to make a sturdy binding. I have used this rolled method before, which is slightly different than the fold over method in most of my quilts. I wanted the backing to show only a little on the front as to not add too much more busyness to an already busy quilt.

Stripy binding and quilted border.
This quilt has a lot of firsts. It is my first traditional block quilt, my first finished commission, the first quilt that I have sold, and my first quilt that has a label.
I used a stamp I had recently made and more of the gray fabric for the label. The stamp is a mad cat, a portrait of Flounder. I used sharpie for the quilt title. I sewed the label on the back of the quilt thru all the layers of the quilt the same way I did the gingham patch on front. I like that it gives it a bit of a punk patch feel, like the ones I used to wear on my jackets.

It was hard to get the detail of the patch label. I pre washed the label and it faded a bit, but I like the results.
This quilt had a quick time line going from request to finished quilt in three months (May 13 - Aug 8th). I haven't kept track but it may be the fastest I've made a quilt. Bippi was most helpful on this quilt, sitting under it on even hot Summer days. This quilt also did some traveling as I took it along on a few trips to the beach in order work on it.

Stars for NFG top hanging out at the beach in NJ!
First Finish of Two Thousand Fourteen
What does one do when a quilt spans the years? If most of a quilt was created in one year, but completed in another, what category do we put it under? This is a new dilemma for me, and I'd like to know how others tackle it!
Although most of the work on my latest quilt was done in the latter part of 2013, it was technically finished in the early days of 2014. I struggled with whether to call this a 2013 quilt... But I decided that it will be my First Finish of 2014!!

I really thought this quilt was going to be a regular rectangle. But they always somehow get out of control and go all wonky. That's what I get for not measuing. And I wouldn't have it any other way!
This is one of my Squares and Strips quilts, which is what I call my version of a crazy patchwork. I used many browns and blues from my stash, mostly vintage and thrifted. It also contains new fabric. Although the front is mostly brown, it also contains white on white and black. Some of my favorite pieces are repurposed black jeans, some tree fabric that my mom and I thrifted last summer, and a swatch of brown and gold that came to live with my when my husband did.
There is a patchwork patch of blues on the front that contains some of my all time favorite anchor fabric that I bought new.
Sometimes not having enough fabric for a backing makes everything more interesting.
The back has a reverse style design. Mostly blue with a patch of brown patchwork. The main bit of blue comes new from Brooklyn General. The binding on the front also follows this "reverse" theme, blue where the front is brown and brown where the front is blue (pretty much).

I used some of my favorite precut squares in this quilt. Both vintage and new.
This quilt is completely hand pieced, basted, quilted and bound. It's my largest to date and has the most quilting. It was a blast to make and it might be one that I keep for myself.

My cats Bippi and Tom spent a lot of time with me on this one. It's pretty fun to snuggle under!
Mad Cat Quilts Welcomes Library Card!
Only the first week of 2014 and new exciting things are already brewing here at Mad Cat Quilts!

The only thing better than a pile of quilts is being snuggled up underneath them!
The site has been slightly updated.
The Portfolio section has been updated with better pictures of the 2013 Collection. The photo are not the complete collection as there are a few things that are still un-given gifts. When the remaining pieces go up, I'll be sure to let you know!
A link to Mad Cat Quilts official Instagram has been added in the navigational bar. It's gaining followers and I hope to gain more in the coming months. There's an upcoming giveaway planned, so stay tuned for more info!
The Shop has also been updated! Go check it out for new pieces, new prices, and best of all new creators!
Mad Cat Quilts proudly presents the addition of Library Card goods for sale!

Library Card creates unique handmade items.
Library Card creations are handmade in Brooklyn and feature a variety of useful objects.
To start, Mad Cat Quilts now has Library Card 2 and 3 pocket wallets for sale! These wallets are super soft and made in a variety of interesting pattern and color combos, using new and vintage fabric. Perfect for tucking in your pocket or bag, these little guys are a simple solution for keeping your money and cards.
