Something New: Smoothie Bowls

When I first started seeing these bowls, in social media, or on the beach, I couldn't figure out what all the fuss was about. Sure, they were pretty and who doesn't like a big bowl of fruit? But what's the big deal?

In July, while my friend was in town, I finally tried a bowl. And it wasn't love at first bite, but I enjoyed it. But then a few days later I was still thinking about it. So I ate another one! Then I started making them at home. And I haven't looked back since. 

IMG_2587.JPG

People love smoothies, they taste good, are pretty and good for you. It makes sense that people like a smoothie, add extra fruit, stuck in a bowl. Factor in that most bowls use delicious and exotic fruits like acai and pitaya which are super good for you. They tend to be topped with superfoods, and are a great way to get your fruits and veggies, protein, vitamins, and nutrients. 

But truth be told, I don't really like smoothies. I don't like the texture. Never been a fan. So why smoothie bowls, you might be asking?
And here's the answer: The ice cream effect. 

Eating smoothie bowls are like eating ice cream, with awesome toppings, for breakfast. 

As you know, I love new ways of eating fruits and veggies (like juicing) and this is another good way. If you like smoothies or if you don't like them, or if you just like ice cream, I suggest you try a smoothie bowl! Around me, there are many places that sell them, I hear you can get them at certain Wholefoods. But also smoothie bowls are super easy to make at home!

Since I started making them I have acquired lots of superfoods for topping, and frozen fruit for different bases, but here is a super easy beginners recipe with things you might already have on hand:

For the smoothie:
3 bananas (sliced and frozen at least 4 hours)
Handful of spinach. I use cleaned fresh baby spinach
A couple of tablespoons of milk (any type you like/have in the house will do. I've used almond and coconut.)
Optionally add any other fruit you like (frozen, fresh, or a little on the old and wrinkly side will do. The key here is not to out weigh the frozen aspect of the bananas).

For the toppings:
Go nuts!
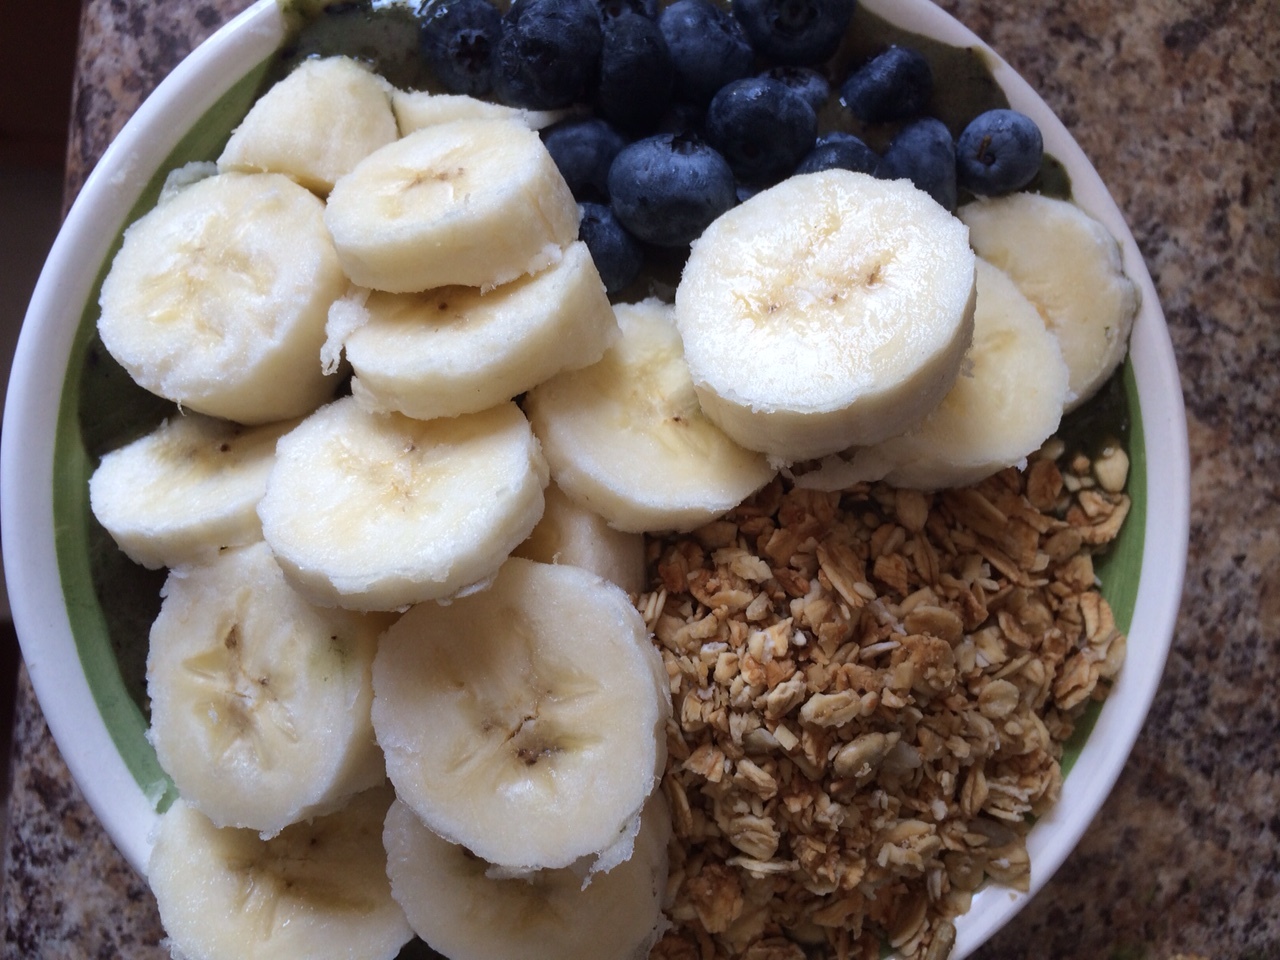
Literally, use nuts. Or seeds, or granola, rawnola, fresh fruit, frozen fruit, superfoods, chocolate sauce, yogurt, oats, oatmeal, peanut butter, any other nut butter, honey, agave, bee pollen, coconut in any form, and on and on, etc...
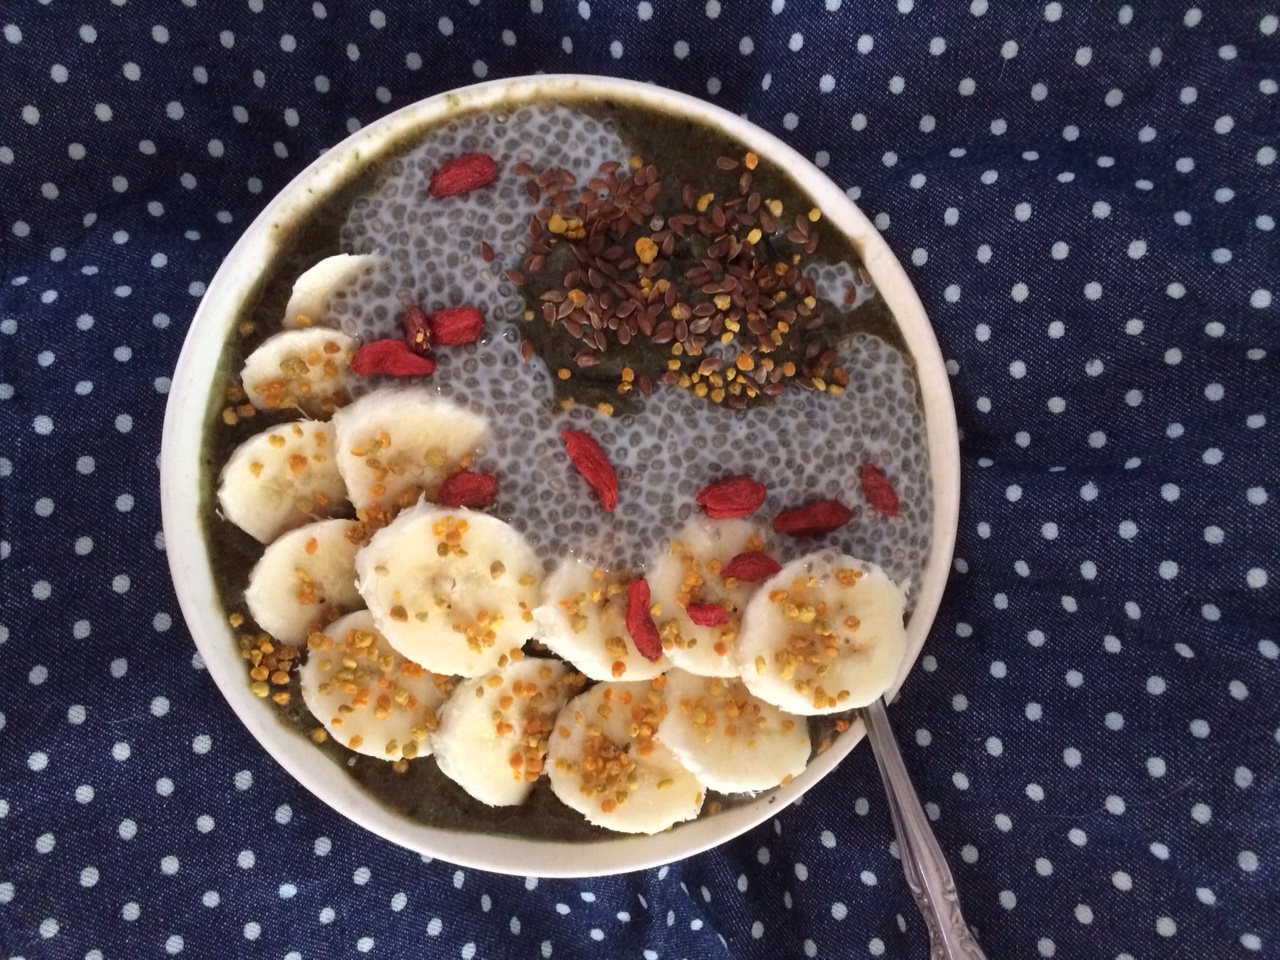
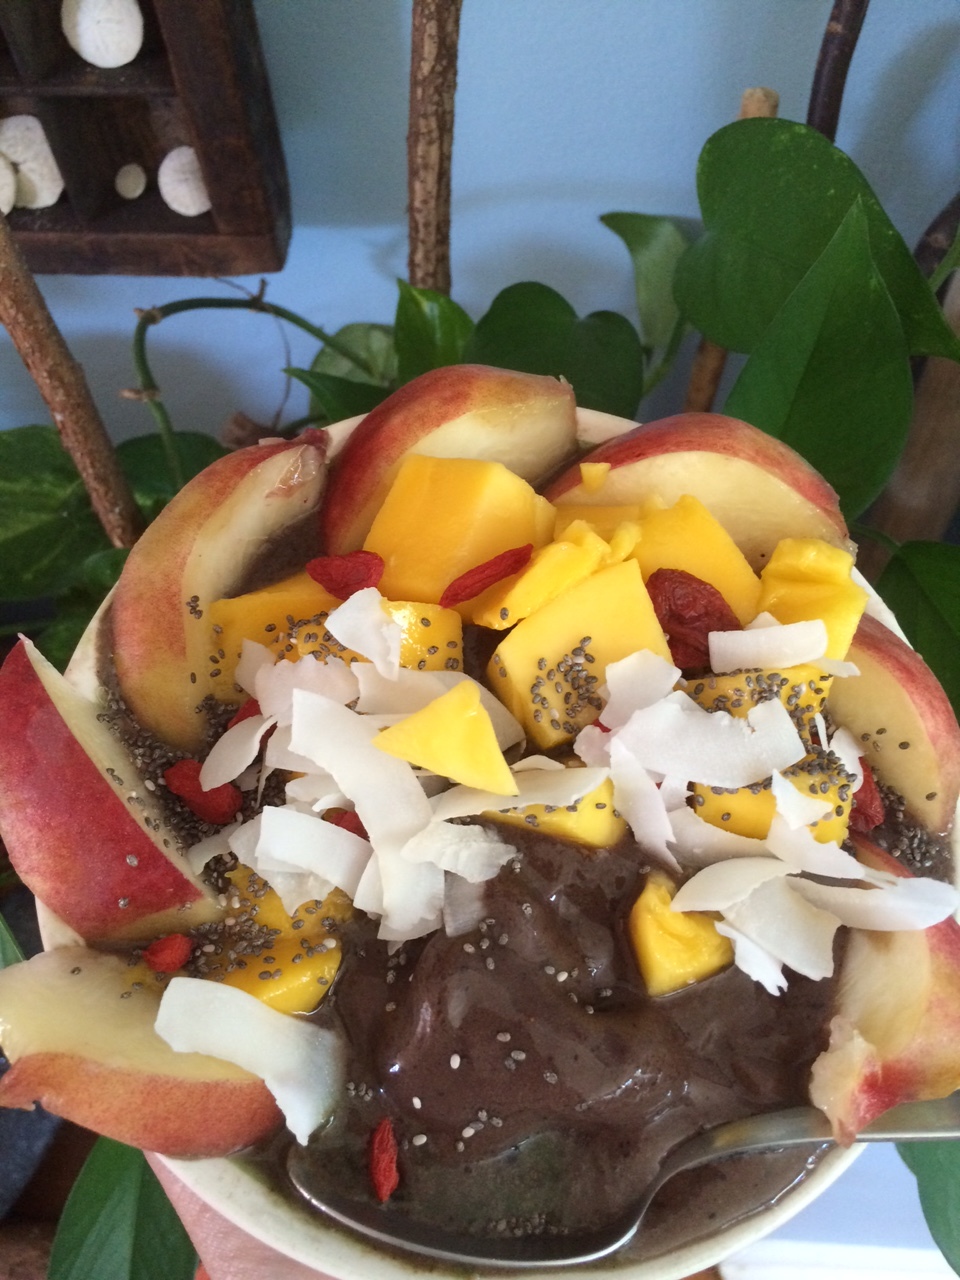
My current favorites are; any local fruit I have on hand, chia seeds (these guys are so healthy and give a nice little pop), cacao nibs for crunch, and goji berries for chew. 

Instructions:
-Get your toppings ready first. I almost always fail to do this but it helps you get to your smoothie bowl faster before it melts (especially useful if you plan on taking photos of your breakfast). Lay out the toppings sundae bar style, or at least keep them in arms length. Have your bowl ready, as well. 
-Into your blender (whatever kind you have works fine) put the spinach and just enough milk to get it blending. This is the time to add any other non frozen fruit you may want. 
-Once the spinach is pureed pretty well, add the frozen fruit. Add more milk for a wetter, smoothie consistency, or less for a "nice cream" style smoothie bowl. I prefer the nice cream rout. 
-Pour your smoothie into a bowl and top with all the good stuff. 
-Eat up and enjoy!

Anyone else eating smoothie bowls? Give us your favorite recipe in the comments!

Something New: Bullet Journaling

I'm a list maker. I make a list everyday. I like to cross things off, to add things in, sometimes to add things in just to then cross them off.

But lists get lost, they get full, new lists need to be made. I'm also a note taker. But where to keep these notes? How to find them?

Even with my notes and lists, I'm not so great at self motivating for well, myself. Give me a job, at work, I'm all over it. But me telling myself I need to do some laundry, or complete a project, or any number of tasks I'm doing for myself, just isn't the same.  
When I realized that I would be working less, and being home more, I knew I needed a real system. 

That's when I discovered Bullet Journaling. I first found it through a link on Rowdy Kittens, and thought it was intriguing.

Bullet Journalling is an analog way to keep your to-dos, appointments, lists, events, personal notes, calendars, habit tracking, reminders, etc.... in one place and away from the internet/phone. It really appealed to me bc it's physical, simple, and easy. 
The idea behind BuJo is simple, keep every thing you need in one place, a single notebook. But the possibilities and variations are endless.

You can find everything you need for the basic set up in the Bullet Journal video. I really love that you don't need any special supplies, you only need a note book and a pen (of course, there is a special BuJo notebook you can buy if you want to). 
Bullet Journal suggests you set up 4 basic things in the journal: An index (where you keep track of everything in the journal), a six month over view or Future Log (where you keep track of large events, holidays, birthdays, etc...), a monthly calendar with checklist (which you make at the beginning of every month and where you keep an overview of that moths events and tasks), and a daily log (which you make day of or a day or two in advance and contains tasks, notes, etc... that pertain to each day). There is a set of symbols to use for each item on any list: a dot for task (to be crossed out when finished), a circle for events, and a dash for notes. It suggests covering these with a forward arrow to move to the next day or month, and a backward arrow to go far in advance (onto the six month overview). 
In addition to the basics, you can take notes (classes, meetings, etc...), make lists (movies to watch, books to read, shopping, and so on), track your habits (water intake, exercise, whatever!), set goals, track social media, log expenses, make charts, graphs, note the weather, draw, practice your calligraphy, and pretty up your journal however you want, to name a few. 
Many people fancy up their journals, making them sketchbook, inspiration book, note book, calendar, appointment book, scrap book, and diary all in one. They use washi tape, markers, fancy headers, stickers, mantras, and anything thing else one can think of. There are tons of site and videos to watch for inspiration and ideas. Some creators have reached near guru status.  

Most people seem to use either a Moleskien or the Leuchtturm 1917 journal but I just rummaged around until I found a blank book with graph paper that I already had. I use a black pen (either a uni-ball, or paper-mate). I don't make any attempt to make it pretty, I really use my Bullet Journal in a utilitarian way.

Here's what I have in my Journal so far:
The Index - My index is a mess! I wasn't really sure how I wanted to set this up so the first page is ugly. That's OK! One of the great things about BuJo is when you "mess up" you can just move on, keep going, and not worry about it. I changed the way I made my index from the first to second page, and I will most likely change the whole thing when I start a new journal
The Future Log - Since I started this journal in April, I made mine until the end of the year. I keep birthdays, holidays, and major events here. It's nice to reference back to when I'm like "when is Calvin's christening?" or "what month are we seeing the Violent Femmes?"
Monthly Calendars - I started this book in mid April and used that month as a test for how I would set up my monthly calendars. So far, I'm making them just the way BuJo suggests; I list the dates of the month, what days the dates fall on, and fill them in with events, appointments, and birthdays. I reference back to this when I need to see only one month, not my entire Future Log. 
Monthly Tasks - Next to each month, I put a list of larger tasks that I want or need to accomplish that month. These are mostly items that do not have a specific date to get done. I refer back to this list to see what I've finished without realizing it (cleaning the microwave) or to add to a daily list if I think I can. 
Daily Log - I use one page for each day of the week (except Sat/Sun, they share a page) to list the tasks I need to or want to get done each day. These can be as mundane as doing the dishes or laundry, cleaning the cat boxes, etc... I use this space for my work schedule, events for the day, and keeping track of getting work at home done. I use the bottom of each page for making notes about that day. I like to keep track of when I took a nap, when interesting things happen, or anything I think I might want to reference back to like "won at cards with Al and Sienna" or "opened all the windows today" etc... My Daily Log is by far my most used and most helpful pages. When the day is over, I make sure to move things forward and cross things off.
Habit Tracker - This is where I keep track of things that I want to get done or things that I do on a very regular basis, or that I want to keep track of how often I actually do them. I list things like exercise, quilting, drawing, juicing, watering the plants, and other things for each day of the week there. When I have completed it, I fill in the little box for the appropriate day and item. I have been doing a weekly habit tracker this month, but for May I'm moving to a monthly one. A nice thing about BuJo is that it's very easy to try new methods of keeping track. You can find what works for you. I think a monthly tracker will give me a better overview of which of these tasks I get done and when I do. If I see I'm not doing something on the regular, I can add it to my Daily Logs. 
Expenses/Earnings - I keep a weekly record of everything that I spend and everything that I earn. I divide one page in three parts, at the top I put my expenses and the date they were purchased, and in the middle I put my earnings for the week (from work, web sales, etc...). At the bottom of this page, I make any note I want to look back on. I'm working on a monthly overview for this as well, to see what I made, spent, and saved, what went to bills, eating out, etc... I haven't worked out how to best log this yet. Any ideas?
Lists and Notes - I keep a few running lists (my yard wish list, things I need my husband to help me with, long term goals...) and a few reoccurring lists (groceries, food that needs to be eaten, dinners for the week...). I keep some notes on budgeting (expenses and time), future projects, and other things.  I add to these whenever necessary. 

These are the symbols I use:
Dot ( • ) - I use the dot for an and all tasks.
Circle - I use this for events such as "work (10am - 3pm)", "drinks with Mike", "rummage sale". 
Dash - I use this for notes in my daily logs, expenses, lists, etc...
X - I X out all finished tasks and events. If I do a task twice, I add an additional X next to it (say washing the dishes twice in one day).
Forward Arrow - I use this when I'm "migrating" a task, when I move a task from one day to the next, or one month to the next if it's a monthly task. I use a double forward arrow when I'm moving something far in the future (more than a day or two). 
Box - I use boxes for habits. I also use them on daily tasks when the task was halfway completed. I fill in boxes as I go. 
Eyeball - I use the eyeball for a research task. Bc I might not need to get this done in a specific time frame, or bc it's easier than writing " • research how to make a bullet point with the keyboard". 

I've only been Bullet Journalling for about three weeks now, but I'm pretty sold. I'm excited to have a small, simple space for all my planning, and to add to it in the future. I can see it being becoming an essential tool in my lifestyle journey. And I can see improving on how I use it to an almost infinite degree. I like it as a day to day tool, but I also like seeing my progress, process and evolution in work and home life I can't wait to see that on a larger scale as weeks and months go by. 

Who out there uses a bullet journal? Share your experiences and links to pics in the comments!

Something New: Scrappy Pin Cushions

I'm sure we're not the only ones scrap busting in our house this year. Sometimes this is a hard activity for me. One way I'm trying to use up scraps this year is by making some scrappy little hearts. Another is to make scrappy over-sized pin cushions!

I try to pretty organically pick bits out of the scrap bins and match them together. I use a bit of scrap batting and pearl cotton or embroidery floss to quilt a quick handy design on them.  

I've been backing them all with a very soft cotton flannel that came in a friends destash. In most things, I don't like the grey, pink and blue plaid, but in these it's completely perfect. 
I fill them from a huge box of fiberfill that we've been working off of for two or three years... Now it's finally dwindling. I hear walnut shells are good for pin cushions. 

You can see the backing peeking out in the photo above. I'm hoping that they will be fun small things to sell at the markets I'm planning this summer. But for now, they are just fun little pillows!

On Quilting Community + Something New

Growing up, one of my best friends and nemesis was named Eleni. We were in the same homeschooling group and our moms were friends. I loved to visit Eleni's house bc she had a piano and her mom sang songs. Eleni had tall mice dolls that she made an amazing Borrowers-esque style doll house for, with acorn top bowls and stoves made out of egg containers. We celebrated cool holidays like Passover and Hanukkah. Eleni could be a brat, too, (as I'm sure I was as well) and sometimes we fought. Sometimes I was jealous of her dollhouse. We grew up and apart. Eleni became a stage actress like she always wanted. I hear she got married. Maybe she has children of her own now. 

I've been thinking of her recently. She was the only person I had ever heard of with that name. 

When I heard about Rachel's (Stitched in Color) daughter's difficult birth and the long, hard road they have ahead of them, I was heart broken. This is a person I've never met, will never meet and know only thru their website. I read all about how Rachel wanted more kids, and her struggles to realize that dream. She didn't write about it too much, and honestly, I never read those entries too thoroughly. It wasn't what I came to the site for. I certainly don't mind knowing about sewists lives, but I tend to read quilt blogs for inspiration in sewing.  
But at some point in the last few years, while reading that site for her quilting knowledge, I became emotionally invested in her life.

I was shocked at my own reaction; a tightening of the throat, and tears welled in my eyes. The only way I can explain it is that by reading these blogs, by writing them, we have formed a community. And when one member of our community is hurting, we all are. Our community fosters inspiration in sewing and quilting, but also in living, growing, and teaching. 

When I discovered Jodi's (Tales of Cloth) call to make #flowersforeleni, I felt compelled to join in, even tho I had only experimented with EPP, and never appliqued before. 

I'm linking this Something New up with Kathy's Quilts for Slow Sunday Stitching (a little late....).

I'm linking this Something New up with Kathy's Quilts for Slow Sunday Stitching (a little late....).

I must say, the results are not the best. Something went wrong with the measurements, I think.... And my applique is decidedly bunchy. But the intent of comfort was there and the prayer for healing. So I think they will do. 

I was very happy to be able to join in and feel close to the quilting community. Just as we hurt together, we heal together also. 

New Block: Fat Little Cross

I had been putting any new blocks I sew under the category Something New. You can see some examples here, here, and here. But I have been doing a lot of new blocks, and plan to do A LOT more this year. So, I think they are going to need their own heading. 

 I happened upon an image of this block on instagram and thought I'd try it! I'm not sure what this one is called. Does anyone know? 

I used some vintage precuts I had. This block is really similar to a churn dash block, but has a totally different feel. I started quilting this to make a pillow out of, which very may well fall into the Something New category. (If I ever finish it!)

Like churn dash blocks, these would be really fun chain piecing blocks on the machine. There are times I wished I used a machine for sewing, especially since one simple block can take so long! But since I only hand sew, I'm linking up with Kathy's Quilts and Slow Stitching Sunday

Something New: Little Hearts

Belated Happy Valentine's Day to all (if you're into that kinda thing)!! We don't really celebrate in our house, no fancy dinners, expensive chocolates, or bunches of red roses. But we do like hearts. Doesn't everyone?

Instagram I took right after making my first block. 

Instagram I took right after making my first block. 

It seems like the appropriate season to post a new block I've made recently. The first little heart I made was from memory from a post by Cluck Cluck Sew. I used 4 HST and it turned out cute! 

But I decided I probably should revisit the post and see how I'd done. The tutorial was not exactly how I'd remembered it, so I made a few more blocks!

Some more wonky than the others....

We are stash busting in our house this year, so I paired the hearts, which came from very old pre cuts, with scrappy greens from the scrap bin. I was able to move 99% of that bin to 2 smaller bins, and organize, so it was a work and fun project! 
A lot of people have been following this tutorial over the last few months. Here are a few of my favorites: Sane, Crazy, Crumby Quilting, Random Thoughts... Do or "Di", and Film in the Fridge. And so many more I have seen, too many to find! Plus a ton on instagram #cluckclucksew.

Today, I'm linking up with Kathy's Quilts for Slow Stitching Sunday. 

Something New: Ohio Star

Back in August, I finished a quilt  that had the first traditional stars blocks I have ever completed. At the time, I thought they might be Ohio Stars (or a variation thereof) but I have come to learn they are Sawtooth Stars (or a variation thereof). I'm still learning about the traditional quilt blocks and techniques. Once my mistake was discovered I became interested in sewing an actual Ohio Star. 

In the last week or so, I have made some Ohio Stars, or a variation of the traditional block, for a gift quilt I am working on. Here is my (terribly wrinkly) first attempt: 

I'm not really a fan of ironing.

I'm not really a fan of ironing.

I'm working on a fairly tight deadline (can I do it?!) so, hopefully, you will be seeing more of this quilt soon!

Something New: EPP

The quilting world loves English Paper Piecing. I wanted to try it to see if I would, too. 

My first attempt. 

My first attempt. 

For those of you who may not be familiar with EPP (English Paper Piecing) Craftsy has a good article and how-to here

Basically, it's a method of hand piecing most used for small or intricate blocks or designs. It involves precisely cutting paper and basting fabric to it before sewing the fabric together for more exact piecing. Many people use basic shapes that are small and may be harder to hand or machine piece without some stiffness and stability. Hexagons are one of the most popular shapes to use.

EPP is known for it's portability. 

EPP is known for it's portability. 

The method is to precisely cut (or buy pre cut) shapes, cut fabric slightly larger, and baste it on to and around the paper. One you have a bunch of basted hexis (or what ever shape you might be using), you put them right side together and sew along the papers edge. You join the fabric covered papers like this, until you have the size and shape you like. Then you can remove the basting stitches and pull out the paper before finishing the piece by quilting, making a pillow, etc...

I had been wanting to try this method for a while bc many people swear by it. EPPing is known for being portable, small, and unwieldy, so I thought I might enjoy it. 

A pile of Octi and some that pieced together already. 

A pile of Octi and some that pieced together already. 

I'd waited before starting an EPP project, bc I had the idea that I would go and buy some paper templates. As weeks went by where I would look longingly at other peoples EPP projects, I realized I was never going to find time to buy the supplies I needed. So I found some stiff paper and some scissors instead. 

The very nature of EPP is to be very precise, my very nature is to be not very precise at all. 

But I forged ahead and cut some very wonky octagons. And then some very wonky squares to go with them, and set to basting. I basted as many as I could stand (like 6) before sewing a few together to see just how it worked.  After doing this a bunch more times, I found out how I preferred to baste the octis and how I preferred to sew them together. Although I had to make many adjustments as I went bc the shapes were not at all uniform, I eventually got into a rhythm. 

A lot of octis and squares sewn together. 

A lot of octis and squares sewn together. 

As with all my quilts, I didn't have a plan or sketch of what I wanted to do. I just made it up as I went along. And as always,  a vague plan started formulating. A pattern emerged and when it was time to stop, I stopped. After about a month I had completed the major part of the EPP project, and now it's set aside to decide what comes next. 

What I am about to say might shock and dismay some people. 

I don't love EPP. It's an interesting method, and I can see where it would be very useful. I didn't hate it but I found it achingly slow, and a little boring. Maybe it's bc I hand piece all my quilts already and this method is more for people who are used to machine sewing? I know I could have pieced the whole thing way quicker, and possibly neater, without the paper basting aspect. I also felt quite bad about all the fabric that was wasted. When I quilt there is rarely any unusable scrap left over. It kinda broke my heart to throw away so many tiny triangles. I found that as the piece got bigger it got harder and harder to handle. The stiffness of the paper became unwieldy and maneuvering became annoying. 

My favorite part is definitely cutting the basting threads and pulling the paper out. I like to see the patchwork all hard and stiff before, and then soft and subtle after. 

The back side of all those octis! You can see on the top left the papers have been removed. 

The back side of all those octis! You can see on the top left the papers have been removed. 

I was also not sold on EPP's portability or ease for travel. I pretty much always take my sewing on the go with me, and rarely find it overly cumbersome. But with EPP I had tiny scrapes everywhere, paper templates popping out all over the place, not to mention the scissors, needle,  and thread. And I had to have a special bag to carry it all in. Usually I just stuff all my sewing in my purse, but bc there are so many pieces of fabric and templates, etc... I needed more organization and therefore more stuff to carry. I was lucky enough to snag one of my husbands first zipper pouches, which did work wonderfully for the job. 

Library Card zipper pouch. 

Library Card zipper pouch. 

I will definitely finish the work. I liked the process and the result enough to make this one project. But bc I didn't like it a lot, I'm not sure what the project will end up being. Only time will tell. 

You just can't put black, purple and gold or orange together without it looking like Halloween. The bats don't help, I guess. 

You just can't put black, purple and gold or orange together without it looking like Halloween. The bats don't help, I guess. 

I'm linking up with a blog I love to read, Kathy's Quilts, for her Slow Sunday Stitching.

Sunday

Sunday Stash #4

Last week I received some vintage fabric to add to my stash. Some of it was immediately dogeared for current projects. 

This is only part of what arrived!

This is only part of what arrived!

Ordering "vintage lots" is a tricky thing. Most times there isn't much description given, and I often just go with my gut. I'd say 9 times out of 10 this works. I've only ever had a few that I was really disappointed with. This was not one of those times. Although old and musty smelling, these five are my favorite from the lot. They will wash nicely, I'm convinced, and be ready to use in no time. The far left red dots and flowers reminds me of the blue flowered fabric from another Sunday Stash, which I adore. The black and white will go perfectly as a backing for a quilt top that is almost complete. The green dots are just right for a friendship star quilt I'm currently piecing. 

I have been waiting for sunnier days and simpler times to post a shop update. Here is a sneak peek at some amazing Library Card felt jewel rings:

Needle felted gems. 

Needle felted gems. 

These oversized felt cocktail rings are soft, comfortable and come in a wide range of colors and sizes. The rich jewel tones and shapes contrast perfectly with the playful textiles and tactile nature of these hand made accessories. I can't wait to get them in the shop!


Mad Cat Quilts Welcomes Library Card!

 Only the first week of 2014 and new exciting things are already brewing here at Mad Cat Quilts!

The only thing better than a pile of quilts is being snuggled up underneath them! 

The only thing better than a pile of quilts is being snuggled up underneath them! 

The site has been slightly updated.

The Portfolio section has been updated with better pictures of the 2013 Collection.  The photo are not the complete collection as there are a few things that are still un-given gifts. When the remaining pieces go up, I'll be sure to let you know! 

A link to Mad Cat Quilts official Instagram has been added in the navigational bar. It's gaining followers and I hope to gain more in the coming months. There's an upcoming giveaway planned, so stay tuned for more info!

The Shop has also been updated! Go check it out for new pieces, new prices, and best of all new creators!

Mad Cat Quilts proudly presents the addition of Library Card goods for sale!

 Library Card creates unique handmade items.

 Library Card creates unique handmade items.

Library Card creations are handmade in Brooklyn and feature a variety of useful objects.

To start, Mad Cat Quilts now has Library Card 2 and 3 pocket wallets for sale! These wallets are super soft and made in a variety of interesting pattern and color combos, using new and vintage fabric. Perfect for tucking in your pocket or bag, these little guys are a simple solution for keeping your money and cards. 

again.jpg